
∘ Enhanced Networking Performance
∘ Understanding ENA and Its Importance
∘ Emphasis on Using the Latest Versions
∘ The oversimplified life of a network packet
∘ Receive Packet Steering (RPS)
Enhanced Networking Performance
In cloud computing, network performance is critical for the scalability and efficiency of applications that demand high throughput and low latency. Modern generations of EC2 instance types feature Enhanced Networking with the Elastic Network Adapter (ENA), and Amazon’s proprietary ENA driver, providing significant performance improvements over traditional virtual machines. This article delves into advanced networking techniques and best practices to optimise network performance on EC2 Linux instances and enhance your application’s performance.
Understanding ENA and Its Importance
Older generations of EC2 instances are virtualised in Xen, and do not support ENA. The modern generations, on the other hand, are virtualised using KVM and have AWS’ proprietary ENA drivers for networking.
With Xen, there’s a concept of dom0, which is the management domain through which every I/O request will go through, and where services for the underlying host would live.
Network I/O would exit the virtual machines (domU) via the netfront/netback drivers, while disk I/O would use the blockfront/blockback.

For every I/O request, the virtual machine (domU) has to process and pass it to dom0 via these drivers, which then would use the actual drivers to pass it on to the actual hardware.
In summary, for every I/O request of the virtual machine (domU), there would always be a middle-man involved (dom0) between the virtual machine and the actual hardware, which results in poor performance, and more importantly, significant jitter, delivering a very unpredictable I/O performance.
Additionally, dom0 would be involved in the I/O requests for ALL virtual machines in that underlying host, which can be a significant number, with possibly up to 100s of virtual machines in the same underlying host. This only adds to the unpredictability of the I/O performance and introduces a significant problem with noisy neighbours.
With Amazon’s proprietary network driver (ENA), this problem is resolved by allowing the virtual machines to communicate directly to the hardware, without the need of a middle-man.
On the modern generations of EC2 instances built on Nitro, there’s no longer a dom0, and AWS moved from Xen altogether, and started using KVM as a hypervisor.
Emphasis on Using the Latest Versions
These improvements have been progressively significant in newer generations of EC2 instances, which underscores the importance of always selecting the latest generation of EC2 instances when maximum performance is required.
It is equally crucial to ensure that your Linux system is using the latest version of the ENA driver, which includes all the new performance optimisations and bug fixes.
The oversimplified life of a network packet
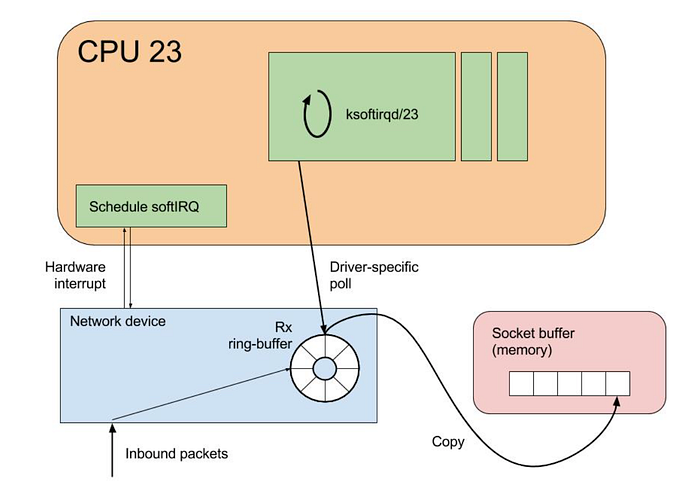
Oversimplifying, the life of a network packet coming from the internet into a Linux system, starts at the arrival in the network interface card, which then would generate an interrupt to signal to the CPU that data has arrived.
The CPU will then pause what it was doing, and handle the interrupt. This involves executing an interrupt handler routine, that processes the incoming packet.
After that, the kernel’s network stack then takes over, and the packet is processed by it. This includes various layers like IP handling, TCP/UDP handling, and more. The kernel checks the packet’s integrity and determines its destination on the system, and handles routing.
If the packet is intended for an application running in the system, it is moved to a socket buffer. These are the endpoints for sending and receiving data on a computer, which sits in the RAM memory.
For the purpose of this article, we will focus on two different steps of the life of a network packet: interrupt handling, which signals the arrival of new data from the hardware, and the ENA queues which handle processing of the network packets within the Linux stack.
For interrupt handling, Linux uses mechanisms such as SoftIRQs and NAPI to efficiently handle network packet processing.
Rather than immediately stopping what the CPU is doing whenever any network packet arrives, using software interrupts (SoftIRQs) the system can accommodate a deferred execution, that allows the kernel to defer its processing in favour of something more urgent.
NAPI is an interface designed to improve network performance under high load. It changes how packets are processed from an interrupt-driven model to a polling model when the network traffic reaches a certain threshold, reducing the overhead caused by excessive interrupts.
ENA Queues
In simple terms, an ENA queue is like a set of conveyor belts that helps manage internet traffic, by handling the network packets in and out of the system. These conveyor belts are organised into two types:
Transmit Queues (Tx), which is where the system puts data that it wants to send out to the internet; and Receive Queues (Rx) which is where incoming data from the internet is received, and then placed into a buffer to process the received data.
Each of these queues has a submission section and a completion section. Initially, the data is placed in the submission section either to be sent out (Tx) or to prepare for receiving incoming data (Rx). The completion section confirms whether the data has been successfully sent or received.
Having this picture of the ENA queues, it’s easy to see how these can become a bottleneck and hinder network performance. EC2 instances can have multiple ENA queues (up to a maximum of 32 per ENI) based on the size of the instance type. This multi-queue support allows for network traffic to be spread across multiple CPU cores, reducing bottlenecks, and improving overall data handling efficiency, with lower latencies and higher throughput.
Using ethtool , we can monitor metrics provided by Amazon's ENA driver, and further understand how the system is handling the traffic load in these queues.
One of the important metrics available is the number of stops in these queues. These mean that packets were submitted to the Tx rings faster than they could be processed, hence causing a drop.
[root@aws rossetv]# ethtool -S eth0|grep stop
     queue_0_tx_queue_stop: 0
     queue_1_tx_queue_stop: 0
When there’s a significant number of stops in the ENA queues, this typically indicates throttling by either AWS throttling, due to exceeding instance network limits, or resource starvation, where there is not enough processing power or buffers available to handle the incoming packets.
To narrow this issue further, we can check for throttling by looking at the exceeded metrics, with the command below.
[root@aws rossetv]# ethtool -S eth0|grep stop
     bw_in_allowance_exceeded: 0
     bw_out_allowance_exceeded: 0
     pps_allowance_exceeded: 0
     conntrack_allowance_exceeded: 0
     linklocal_allowance_exceeded: 0
If there is a non-zero value in any of these counters, refer to a previous article of mine on Troubleshooting AWS network throttling, which I am linking here.
When there is confirmation that no throttling occurred from the AWS side, this would mean that your system is likely facing resource starvation for networking.
CPU Starvation
Expanding further on the ENA queues, these will process network packets. Before that point, there will also be IRQ handling by the kernel, which handles the interrupts coming from the network card, signalling to the CPU that new data has arrived. The CPU then stops its current task to handle the interrupt, and further down the road this data will be handled by ENA as a network packet.
If the vCPUs of an instance are overloaded or unevenly utilised, it might cause delays in network traffic processing, leading to packet drops on the Rx side and completion timeouts on the Tx side, which results in low performance and increased highly variable latency.
To achieve high and stable network performance, it’s essential to ensure that the vCPUs in charge of handling the network traffic (the ENA queues) are available and given sufficient processing time for this task.
Most of the network processing occurs in NAPI routing, running in softirq context. These CPU cores involved in NAPI processing can be identified by running the following command:
[root@aws rossetv]# egrep 'CPU|eth0' /proc/interrupts
           CPU0       CPU1
 28:       4531       1535   PCI-MSI 81921-edge      eth0-Tx-Rx-0
 29:        460       4311   PCI-MSI 81922-edge      eth0-Tx-Rx-1
[root@aws rossetv]#
In some cases, you might also see that the ksoftirqd threads are consuming nearly 100% of the CPU core. These threads are in charge of handling these interrupts, before the traffic reaches the ENA queues.
There are several potential causes for CPU starvation in network processing: it could simply be that the system is overloaded with other CPU-intensive tasks, detectable by utilities such as htop, or using perf to determine where the cores spend most of their time.
Sometimes, the high CPU utilisation has a spiky nature, resulting in short-lasting peaks of high CPU usage. In these cases, you can increase the size of the Rx ring, to compensate for temporary CPU unavailability.
By default, the ENA Rx ring size is 1K entries, but it can be dynamically increased up to 16K entries by using ethtool. To increase the Rx ring size on eth0 to 4096 for example, you could use the command below.
sudo ethtool -G eth0 rx 4096
If the CPU cores that are responsible for network processing are constantly overloaded and approach 100% utilisation, while the overall CPU usage isn’t that high, this might indicate uneven load distribution across the available vCPUs.
This can be fixed by reassigning other tasks running on the overloaded vCPUs to other less loaded vCPUs that don’t participate in network processing with either taskset or numactl Linux utilities.
It is also possible to steer away network interrupts from already overloaded vCPUs, by setting the IRQBALANCE_BANNED_CPUS in your system's /etc/sysconfig/irqbalance, to the CPU mask indicating CPUs that you want to exclude, and then restart the irqbalance service.
With this approach, you can ensure that the CPU cores that handle the ENA queues are not also busy handling network IRQs.
If there are more CPU cores in your EC2 instance than there are ENA queues, you can also enable receive packet steering (RPS) to offload part of the Rx traffic processing to other vCPUs. It is advised however to keep the RPS vCPU cores at the same NUMA node as the vCPU nodes processing ENA IRQs. Also avoid having RPS vCPU on sibling cores of IRQ vCPUs, when hyperthreading is enabled.
The above indicated approaches can give you a very fine control over what CPU cores handle which aspects of the network processing work on Linux, to ensure absolute maximum performance.
Receive Packet Steering (RPS)
Receive packet steering (RPS) is a method for directing network packets for specific CPUs for processing. This can be implemented to help prevent the hardware queue of a single network interface card from becoming a bottleneck in network traffic.
RPS is configured for each network device and receive queue, specifically within the /sys/class/net/eth0/queues/rx-0/rps_cpus file, where eth0 is the network device and rx-0 denotes the appropriate receive queue.
By default, the rps_cpus file is set to 0, which effectively disables RPS, meaning that the same CPU core handling the network interrupt also process the packet. To enable RPS, you can configure the appropriate rps_cpus file with the CPUs that should process the packets from the specified network device and receive queue.
The configuration in the rps_cpus files use comma-separated CPU bitmaps. To enable a CPU to manage interrupts for a receive queue on an interface, you must set the values in the bitmap to 1.
You can identify which CPUs are affiliated with which NUMA nodes using the lscpu command, as shown below:
[root@aws rossetv]# lscpu | grep NUMA
NUMA node(s): 2
NUMA node0 CPU(s): 0-15,32-47
NUMA node1 CPU(s): 16-31,48-63
With the above example, let’s enable RPS for cores 48 to 63. This system has 64 cores, and each hexadecimal character in the bitmask represents 4 bits, so we will need 16 hexadecimal characters to represent 64 bits. To enable the last 16 cores (48–63) for RPS, we need the last 16 bits set to 1 and all other bits set to 0. The hexadecimal representation for 1111 1111 1111 1111 (16 bits for cores 48-63) is FFFF.
Since we are working with a 64-bit representation, and need to enable the highest 16 bits, the bitmask would be 0000,00000000,00000000,0000FFFF.
To apply this setting across multiple receive queues, you can use the following commands to loop through Rx queues rx-0 to rx-15 on the eth0 interface, setting them to use only cores 48 to 63:
sudo bash -c 'for i in $(seq 0 15); do echo "0000,00000000,00000000,0000FFFF" > /sys/class/net/eth0/queues/rx-$i/rps_cpus; done'
This change will not persist after a reboot though. To make it persistent, after testing we can write a simple script and add it to run upon boot, with the commands below.
sudo su
echo 'for i in `seq 0 15`; do echo $(printf "0000,00000000,00000000,0000FFFF") | sudo tee /sys/class/net/eth0/queues/rx-$i/rps_cpus; done' > /sbin/rps_core
chmod +x /sbin/rps_core
echo "/sbin/rps_core" >> /etc/rc.local
chmod +x /etc/rc.local
Please note, if the irqbalance service is active, IRQ processing may migrate to different vCPUs, potentially diminishing the effectiveness of RPS. While it is not advisable to disable irqbalance, you can specify which CPU cores to exclude from IRQ processing by setting the IRQBALANCE_BANNED_CPUS variable in /etc/sysconfig/irqbalance.
The CPU mask would be calculated the same way as above, so in this specific example we would set IRQBALANCE_BANNED_CPUS=0000,00000000,00000000,FFFF and restart irqlbalance with the commands below.
sudo su
echo "IRQBALANCE_BANNED_CPUS=0000,00000000,00000000,FFFF" >> /etc/sysconfig/irqbalance
sudo systemctl restart irqbalance
Interrupt Moderation
High network throughput and low latency are key goals in high performance cloud environments. However, there is a trade-off between latency and throughput from the perspective of an Ethernet controller.
To achieve lower latency, the controller usually minimises the interval between interrupts to speed up small packet processing at the price of causing higher CPU usage and lower throughput.
On the other hand, to improve throughput and minimise the overhead caused by frequent interrupts, larger interrupt intervals are desirable. So an appropriate interrupt interval is critical to getting the best performance balance.
Interrupt moderation is a driver feature supported by the Nitro powered instance types using ENA, that allows the user to manage the rate of interrupts to the CPU during packet transmission and reception.
Without any interrupt moderation, the system triggers an interrupt for every transmitted and received packet. Although this can minimise latency on each packet, extra CPU resources are spent on interrupt processing overhead, which can significantly reduce the throughput.
When interruption moderation is enabled, multiple packets are handled for each interrupt, so that the overall interrupt processing efficiency is improved, and CPU utilisation is decreased, in exchange of a higher latency as the CPU waits for multiple packets before handling.
In EC2 instances using the ENA driver, for Tx the static interrupt delay is set to 64 µsec by default.
As for Rx moderation rate, its setting might vary depending on the instance type. In some instances, types Rx moderation is disabled by default, while in others it is enabled in adaptive mode.
This can be checked using ethtool with the command below.
[root@aws rossetv]# ethtool -c eth0
Coalesce parameters for eth0:
Adaptive RX: off  TX: n/a
stats-block-usecs: n/a
sample-interval: n/a
pkt-rate-low: n/a
pkt-rate-high: n/a
rx-usecs: 0
rx-frames: n/a
rx-usecs-irq: n/a
rx-frames-irq: n/atx-usecs: 64
tx-frames: n/a
tx-usecs-irq: n/a
tx-frames-irq: n/arx-usecs-low: n/a
rx-frame-low: n/a
tx-usecs-low: n/a
tx-frame-low: n/arx-usecs-high: n/a
rx-frame-high: n/a
tx-usecs-high: n/a
tx-frame-high: n/aCQE mode RX: n/a  TX: n/a[root@aws rossetv]#
In the example above, interrupt moderation for Rx is disabled.
If you have a high interrupt rate, it would be recommended to enable adaptive Rx moderation, which dynamically adjusts the interrupt rate based on the packet size and average throughput. This can be done with the command below.
sudo ethtool -C eth0 adaptive-rx on
Memory Constraints
While we heavily covered CPU starvation for network processing, memory can also be a significant constraint, as if the buffers are exhausted, it will start to drop packets.
You should ensure that your reserved kernel memory is sufficient to sustain a high rate of packet buffer allocations. This can be set by tweaking the parameter vm.min_free_kbytes from /etc/sysctl.conf.
As a rule of thumb, you should set this value to around 3% of the available system memory. This can be set with the commands below, setting the value in kbytes.
echo "vm.min_free_kbytes = 1048576" >> /etc/sysctl.conf
sudo sysctl -p
For applications that are heavily using UDP, the buffers specific to UDP should also be increased, since by default Linux places very restrictire limits on the performance of UDP protocol by limiting the size of the UDP traffic that is allowed to buffer on the receive socket.
Below commands would set the UDP buffers to 128MB (in kbytes), for example.
sudo su
echo "net.core.rmem_max=134217728" >> /etc/sysctl.conf
echo "net.core.rmem_default=134217728" >> /etc/sysctl.conf
sysctl -p
Let's have a chat!
To summarize, attaining high throughput with low latency involves overcoming three key challenges: A WS Throttling, CPU Starvation, and Memory Starvation.
By tackling these issues, you can enhance networking performance to achieve maximum throughput and minimum latency.
In the previous sections, we explored various ways to address these constraints under different conditions. Although the strategies mentioned generally apply to many settings, each environment has its unique aspects.
With this in mind, why not start a conversation? Contact DoiT to arrange a discussion about network optimisation and other topics with our Cloud Architects.
stop
Should be word exceeded.
Reply
this is pure gold !!!
Reply