
Photo by Cooler8 from Shutterstock
Live streaming has become an integral part of engaging audiences and broadcasting events in real-time. With the rise of platforms like Vimeo, YouTube Live, and Facebook Live, the demand for high-quality, reliable, and scalable live streaming solutions has grown exponentially. Amazon Web Services (AWS) offers a powerful suite of tools for live streaming, and one of the key services in this domain is Amazon Elemental MediaLive, a broadcast-grade live video processing service.
Whether you’re broadcasting live events, sports, news, or entertainment, ensuring a seamless streaming experience for your viewers is crucial. However, building and managing a reliable live-streaming workflow can be complex. This is where AWS Elemental MediaLive steps in, offering a robust and scalable solution for live video processing on the cloud. It allows you to connect with audiences in real-time, foster engagement, and deliver impactful content while providing advanced video processing capabilities, including transcoding, packaging, and encryption, ensuring high-quality delivery across different devices and platforms globally.
In this beginner’s guide, we’ll explore how to quickly deploy a live streaming solution on AWS, using the AWS Elemental MediaLive Workflow Wizard feature in just a few minutes, and also learn some basics along the way. Let's get started.

Architectural Workflow
**Create the workflow**
Step 1:- Create the workflow
Go to AWS Elemental MediaLive console → Click on “Workflow wizard” → “Create workflow”.

Workflow wizard

Create workflow
Step 2:- Enter Basic Details
Workflow Name . e.g. myfirst-medialive-channel → Select MediaLive Channel Class. e.g. Single pipeline → IAM role . e.g. Create a role (first create and select the created role) → Next.
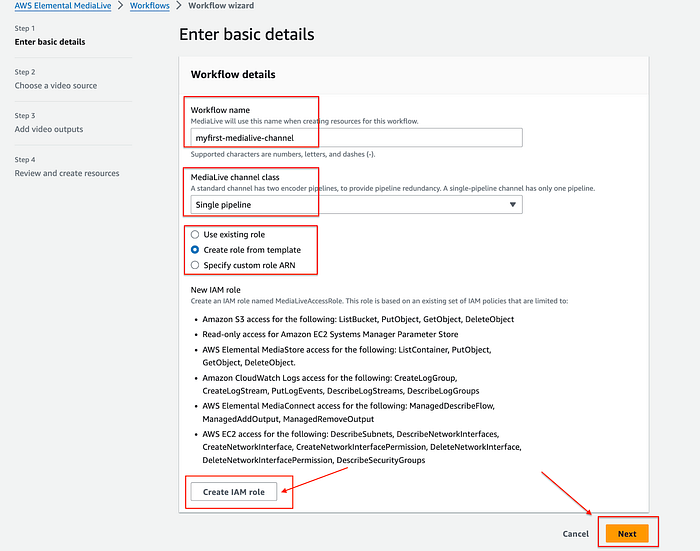
Step 2
Note — single pipeline channel will give you one static endpoint to push your stream and a standard pipeline channel will give you 2 static endpoints. e.g. rtmp://3.216.59.247:1935/myfirst-medialive/input-1
Step 3:- Choose a video source
3.1:- Choose an input type
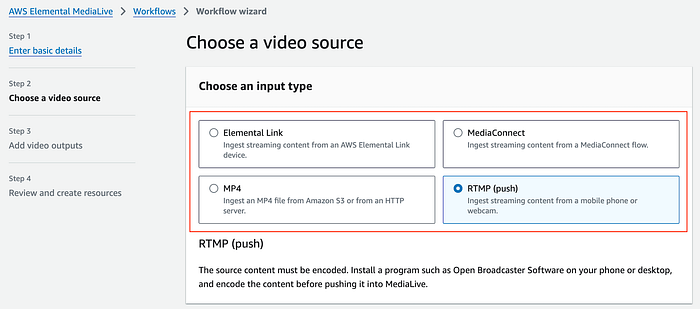
3.1: Choose an input type
Now, while choosing input, there are currently four available options, and you should select the option that best suits your use case. For demonstration purposes, we will be using RTMP(push).
- Elemental link— is an encoding devices that connect a live video source, like a camera or video production equipment, to the cloud (MediaLive)

Elemental Link Device options
2. MediaConnect— is a reliable, secure, and flexible transport service for live video that enables broadcasters and content owners to build live video workflows and securely share live content with partners and customers. It helps to run channels or stream live events and transport high-value live video streams into, through, and out of the AWS Cloud.
- MP4— You can push non-streaming input MP4 (.mp4 extension) files directly from S3 to Elemental MediaLive Channel and stream them a live broadcast.
4. RTMP(push)— You can ingest streaming content from a mobile phone or desktop. You can use any Broadcaster Software of your choice.
3.2:- Select or create an input
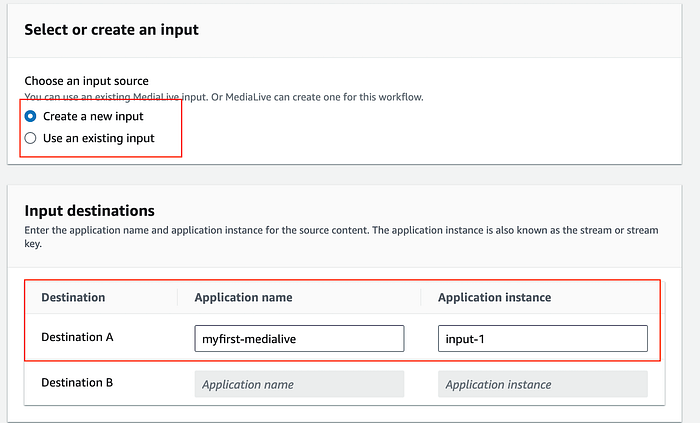
3.2: Select or create an input
Note — when you create input, you can choose any name for the Application name and Application instance, but think of it as stream endpoint and stream key when broadcasting. You want to make it complex to make it hard to guess. There is also another security mechanism (step 3.3)i.e security group, where the stream can be pushed to your endpoints.
3.3:- Create or use existing input security group — To limit stream sources for your MediaLive channel, specify allowed input origins using network CIDR ranges from your authorized sources, such as:
- Specific machine IP
- Studio network range
- On-prem or VPC CIDR block
This ensures only trusted networks can push content to your channel. e.g.
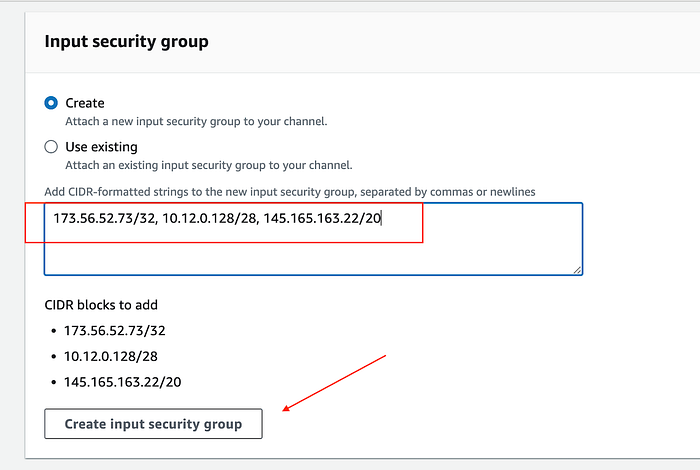
3.3: Create or use existing input security group
3.4:- Select input codec— I have kept it default but you can find supported Video and Audio input codecs supported by MediaLive here.
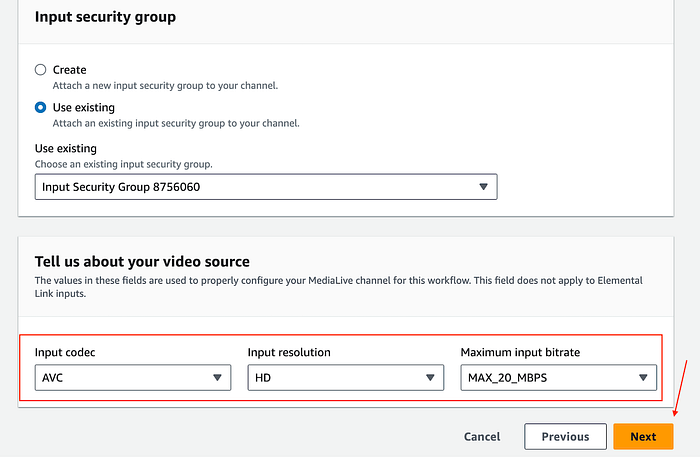
3.4: Select input codec
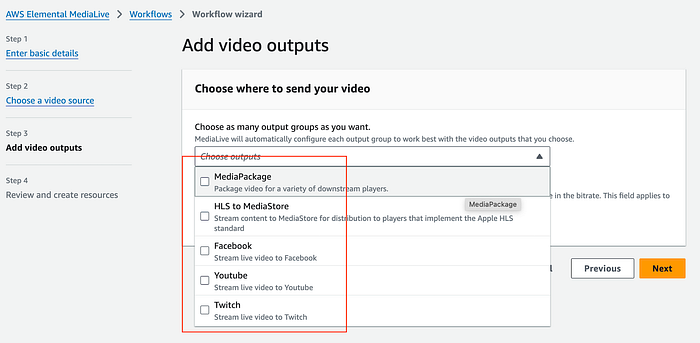
Step 4:- Add video outputs
4.1: Choose where to send your video — You have several options here like MediaPackage , HLS to MediaStore , and social media platforms like Facebook, Youtube, and Twitch TV. You can select one or more options as per your need and select video quality between Standard and Enhanced.
4.2:- MediaPackage destination
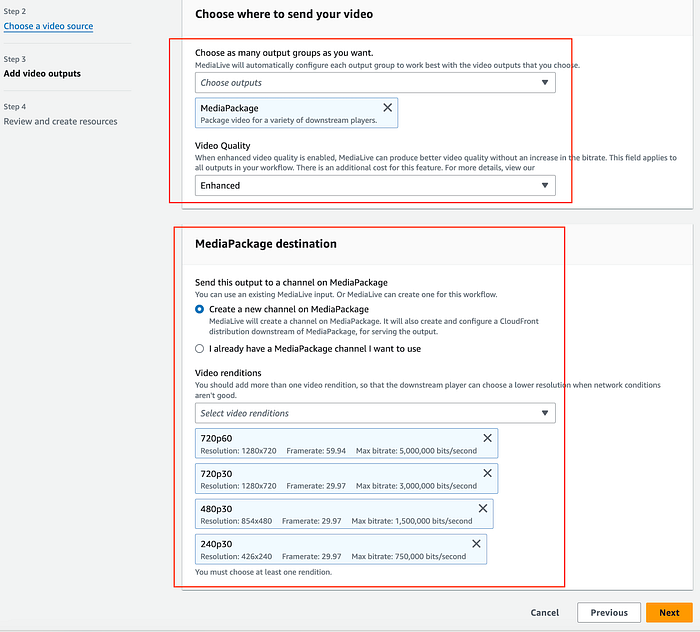
You can add additional resolutions and framerates to support your viewers.

Additional resolutions and framerates
Step 5:- Review and Create
You can now see that the workflow state is “ create in progress”. This means, that your workflow has created a CloudFormation template as per the options you have selected and now getting deployed for you.

Workflow in progress
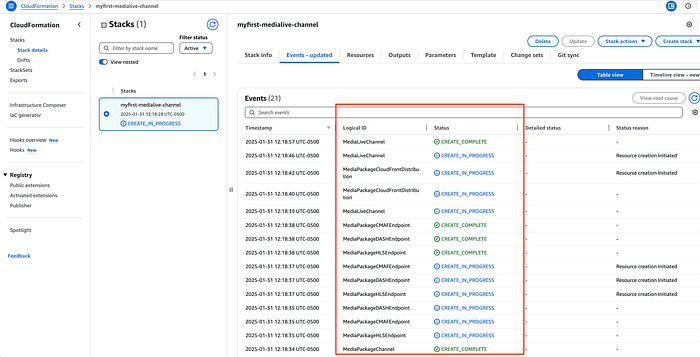
Workflow CloudFormation in progress.
Step 6:- Check the details
6.1:- Workflow Complete— Note that we have not started workflow yet. It's in an Idle state means your Medialive Channel is not running.
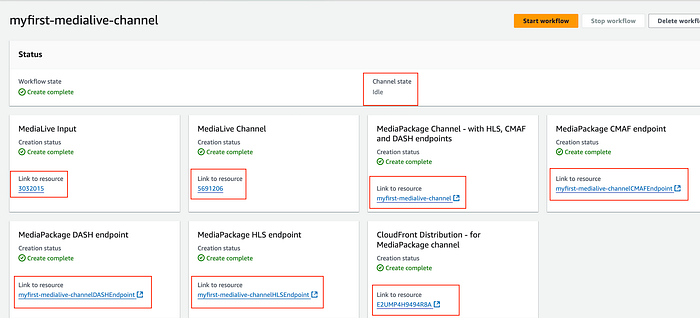
6.2:- CloudFormation Deployment Complete— CloudFormation has deployed multiple resources successfully.

Workflow Wizard has successfully created and deployed the CloudFormation template and stitched all components together. The workflow looks like this: Live Source → RTMP Push → MediaLive Input → MediaLive Channel (transcoding) → MediaPackage (packaging) → CloudFront (global delivery) → End Users.
AWS Elemental MediaLive will take and process RTMP input and transcode it to produce multiple output formats as you selected. e.g. (step 4.2)
- 1080p60 (1920x1080 at 60fps, up to 6Mbps)
- 1080p30 (1920x1080 at 30fps, up to 5Mbps)
- 720p60 (1280x720 at 60fps, up to 5Mbps)
- 720p30 (1280x720 at 30fps, up to 3Mbps)
- 480p30 (854x480 at 30fps, up to 1.5Mbps)
- 240p30 (426x240 at 30fps, up to 750Kbps)
AWS Elemental MediaPackage does the packaging. The MediaPackage channel will receive all processed streams and provide three different types of outputs (endpoints) from transcoded content. It creates and manages playlists/manifests.
- HLS endpoint (for Apple devices and general compatibility)
- DASH endpoint (for Android and other DASH-compatible players)
- CMAF endpoint (Common Media Application Format for modern streaming)
AWS CloudFront will do the global distribution of streams for users.
Before we go on and start the workflow and start pushing the stream to our Elemental MediaLive Channel, I would like to mention that you can attach up to 20 inputs to one Medialive Channel. There are some limitations depending on the input type. The use case can be different. e.g., You want to switch inputs to your Medialive channel for live broadcasting. The first stream will have a looping video before the event starts, and the second stream go live when the event starts, input switching is possible with Medialive schedules, which is another topic for another time.
Now, note down your input endpoint details. You can get them from Workflow Wizard or MediaLive Channel details or the Input section itself.
e.g. rtmp://3.216.59.247:1935/myfirst-medialive/input-1
I am using OBS Studio for streaming my content, but you can choose any other streaming tool you like.
Stream media to your channel
Step 7:- Configure OBS
7.1:- Configure the stream source in OBS
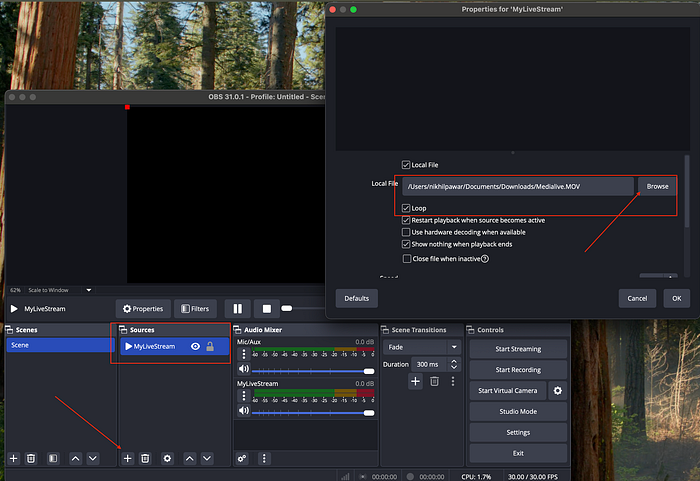
Source
7.2:- Configure the destination for OBS
My input endpoint is— rtmp://3.216.59.247:1935/myfirst-medialive/input-1 and I had given the Application name: myfirst-medialive and Application instance: input-1(stream key).
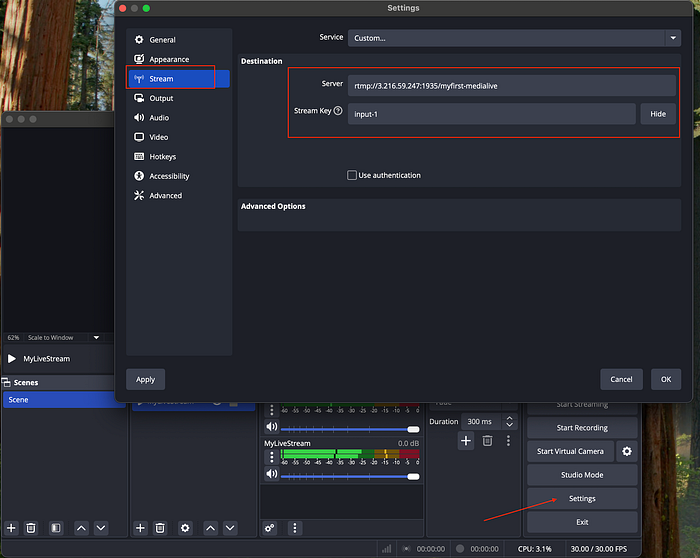
Broadcasting destination
Step 8:- Start Workflow Wizard
Make sure your Elemental MediaLive channel is Running state and not in Idle state.

Channel online
Step 9:- LiveVideo Broadcasting
Start the RTMP push by clicking start streaming in OBS Studio.
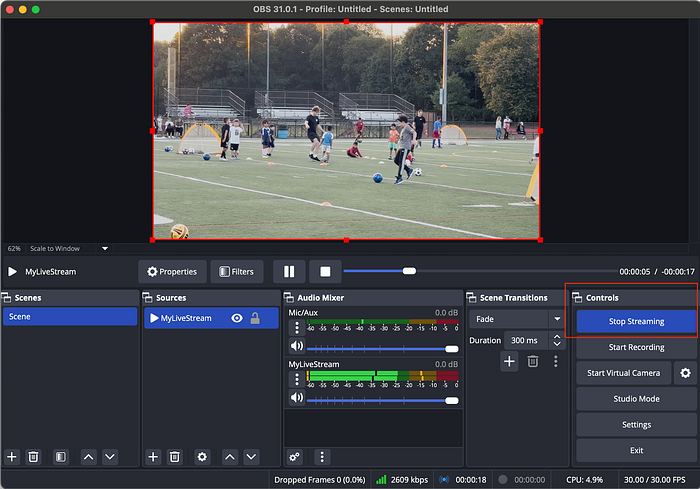
Go to the HLS endpoint and click “Preview Player” to view your live stream.
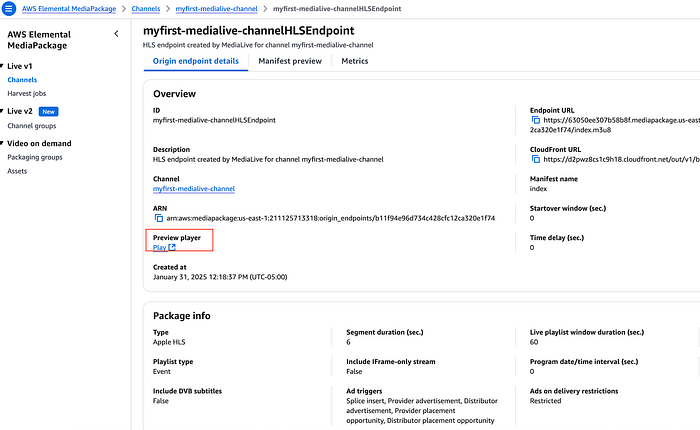
HLS endpoint
Live Broadcasting with Medialive
And there you have it! Setting up live streaming on AWS doesn’t have to be complicated. With MediaLive’s Workflow Wizard, you can have your streams up and running in minutes instead of hours. You can create more customized templates to reuse them.
**Cleanup**
Go to Workflow Wizard → Select your workflow → Stop Workflow → Delete Workflow.
Whether you’re building a streaming platform or exploring AWS’s media capabilities, I hope this walkthrough helped simplify the MediaLive setup process. From cloud architecture design to infrastructure automation, DoiT International offers comprehensive expertise to help modernize your cloud infrastructure. Ready to optimize your AWS Media Services implementation? Contact us here to learn about our cloud engineering solutions.