
In the fall of 2024, Google Cloud released Cloud Key Management Service (KMS) with Autokey into General Availability, enabling a streamlined approach for managing encryption keys across various Google Cloud services. KMS Autokey aims to simplify the process of creating and managing Customer-Managed Encryption Keys (CMEKs) by automating key provisioning, assignment and rotation. This makes security easier to manage and aligns your infrastructure with industry best practices for data protection.
In this article, we will walk through what Cloud KMS with Autokey is, how it works, how to enable and use it, and even how to disable it.
What is Cloud KMS with Autokey?
Cloud KMS with Autokey automates the creation of encryption keys when resources are deployed in supported services such as Cloud Storage, Compute Engine, BigQuery, Secret Manager, Cloud SQL, and Spanner.
Previously, you would need to pre-provision keys, key rings, and service accounts before using them, now with KMS Autokey, all of that is taken care of on the fly. When a new resource is created, KMS Autokey generates keys on demand, ensuring seamless encryption for your workloads without manual intervention.
Why use Cloud KMS with Autokey?
Cloud KMS with Autokey not only simplifies key management, but it also ensures your security practices meet industry standards and recommended practices. This includes:
- Hardware Security Module (HSM) protection for your keys.
- Separation of duties through role-based access controls.
- Automatic key rotation to keep your data secure.
- Key location control for compliance with regulatory requirements.
- Key specificity for granular access management.
Keys generated via Cloud KMS with Autokey function exactly like other Cloud HSM keys, but the process is automatic and scalable, making it ideal for dynamic environments where new resources are frequently deployed.
There is no additional cost to use Cloud KMS with Autokey. Keys created using Autokey are priced the same as any other Cloud HSM keys.
How to Enable KMS Autokey
Enabling Cloud KMS with Autokey requires setting it up at the folder level within your Google Cloud Organization. This means that you will need to create a new folder, or use an existing folder, then create a project inside your folder to store your keys. You then create new projects within the folder, or move existing projects into the folder to leverage the Autokey creation feature. In the example below, we are creating a new folder, and two projects within the folder. I prefer creating a new folder instead of using an existing folder because you can use the new folder as a security boundary and allow access with least level privileges in mind.
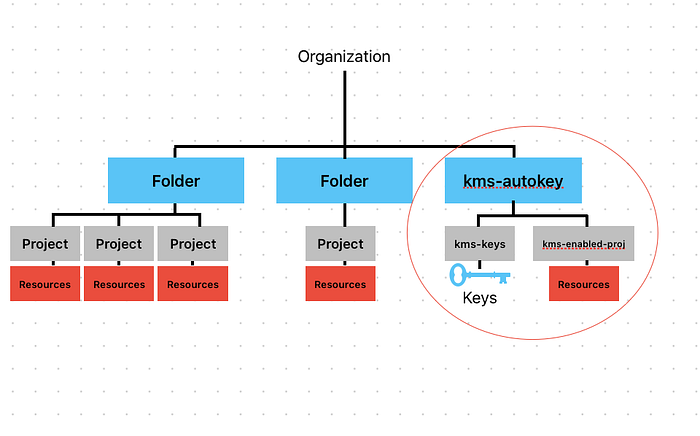
example of folder structure
Step 1: Create a Folder and two Projects inside Folder
- Folder name: kms-autokey (folder with Cloud KMS Autokey enabled)
- Project name: kms-keys (project that stores the keys)
- Project name: kms-enabled-proj (project that has keys assigned to resources)
Step 2: Grant Required IAM Roles
For Cloud KMS with Autokey to function properly, certain roles need to be assigned to you at the organization and folder level:
Folder Level (kms-autokey folder)
- Cloud KMS Autokey Admin (roles/cloudkms.autokeyAdmin)
- Folder IAM Admin (roles/resourcemanager.folderIamAdmin)
Organization Level
- Billing Account User (roles/billing.user)
Once you are granted these roles, you can enable Cloud KMS with Autokey in the folder.
Step 3: Enable Cloud KMS with Autokey in the Folder
- In your GCP Console, Select the kms-autokey folder.
- Navigate to Key Management.

select folder, navigate to key management
3. From the context picker, select the project that will contain your keys. In our example, it’s kms-keys.
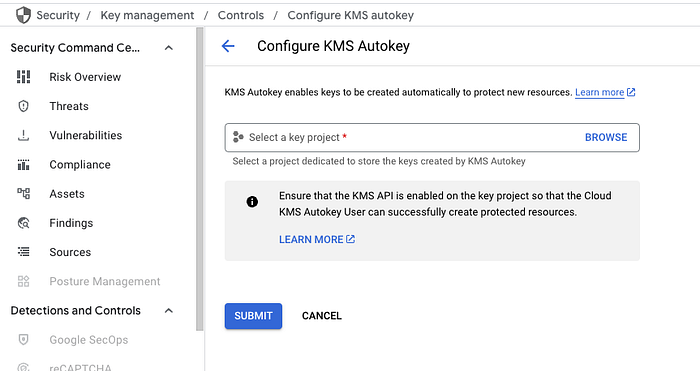
attach project that will manage the keys to the folder
Step 4: Create the Service Account
In the KMS key project (kms-keys), you will need to create a service agent account to allow the KMS service to interact with your resources. In cloud shell:
gcloud beta services identity create --service=cloudkms.googleapis.com --project=PROJECT_NUMBER
replace PROJECT_NUMBER with the project number of the KMS key project, in our example, it’s the project number for kms-keys
example output
gcloud beta services identity create --service=cloudkms.googleapis.com --project=937192488103
Service identity created: [email protected]
Then, grant Cloud KMS Admin permissions to the service agent:
gcloud projects add-iam-policy-binding PROJECT_NUMBER --role=roles/cloudkms.admin --member=serviceAccount:[email protected]
Again, replace PROJECT_NUMBER with the project number of the KMS key project, in our example, it’s the project number for kms-keys
example output
gcloud projects add-iam-policy-binding 937192488103 --role=roles/cloudkms.admin --member=serviceAccount:[email protected]
Updated IAM policy for project [937192488103].
bindings:
- members:
  - serviceAccount:[email protected]
  role: roles/cloudkms.admin
- members:
  - user:<omitted>@doit.com
  role: roles/owner
etag: BwYsUy7dhpo=
version: 1
Step 5: Grant KMS Autokey User Role
To enable developers to use KMS Autokey, you need to grant them the roles/cloudkms.autokeyUser role. This can be done either at the folder level or the project level. Here’s how you can grant it at the folder level:
gcloud resource-manager folders add-iam-policy-binding FOLDER_ID --role=roles/cloudkms.autokeyUser --member=user:USER_EMAIL
Replace FOLDER_ID with the folder we are enabling Autokey in, for our example, that would be the kms-autokey folder id. Replace USER_EMAIL with the email address of whom you want to grant permissions to use KMS Autokey, ie a developer user or group.
example output
gcloud resource-manager folders add-iam-policy-binding 279174226974 --role=roles/cloudkms.autokeyUser --member=user:<developers email address>
Updated IAM policy for folder [279174226974].
bindings:
- members:
  - user:<omitted>@doit.com
  role: roles/cloudkms.autokeyAdmin
- members:
  - user:<omitted>@doit.com
  role: roles/cloudkms.autokeyUser
- members:
  - user:<omitted>@doit.com
  role: roles/resourcemanager.folderAdmin
- members:
  - user:<omitted>@doit.com
  role: roles/resourcemanager.folderEditor
etag: BwYsU4vSoEA=
version: 1
Once this role is assigned, developers can create keys on demand while creating resources.
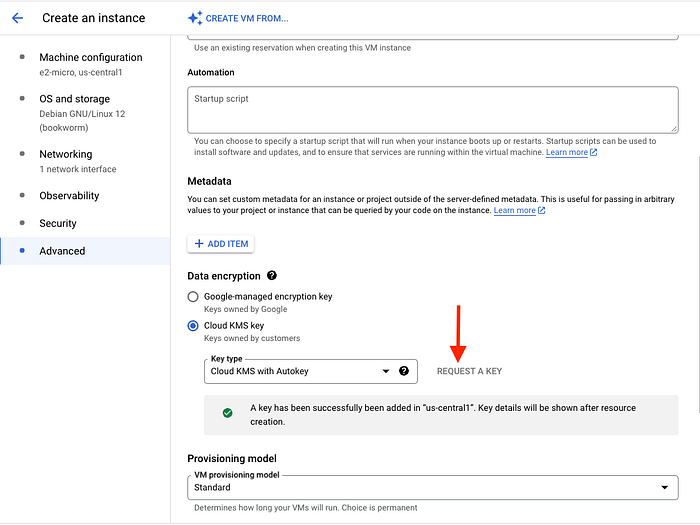
Step 6: Create Resources with Cloud KMS Autokey
To test the setup, create a new compute instance in your newly enabled project. In our example, that would be the kms-enabled-proj project. Under Advanced, select Data encryption = Cloud KMS key and Key type = Cloud KMS with Autokey, then “Request a Key”
GCE instance creation showing advanced tab and location to request key
After the instance is created, you will see the key details in the Management section of the compute instance’s Metadata.
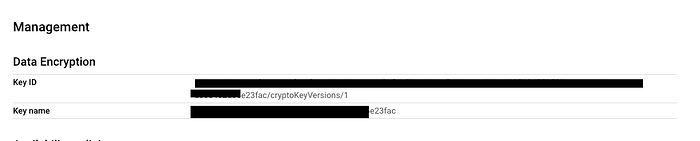
key details
Return to your KMS key project (kms-keys), go to Key Management, and you will see the new key created for the instance along with its next rotation date.

key ring created in same region as GCE instance
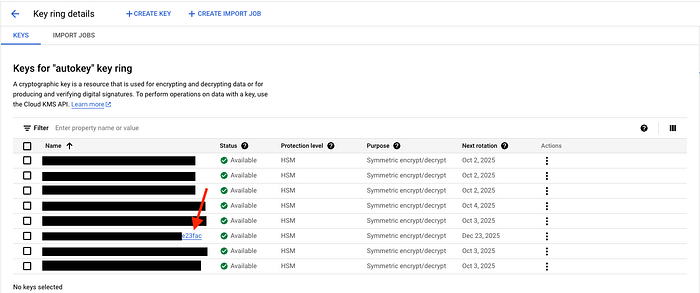
key shown with next rotation date
In our example, a keyring is created in us-central1 because that is where our compute instance resides. Key rings are automatically created in the region that hosts your resources.
Disabling Cloud KMS with Autokey
If you ever need to disable Cloud KMS with Autokey, it can be done at the folder level. Disabling removes the configuration that links the folder with the key project, effectively preventing the automatic creation of keys for new resources. All existing keys created by Cloud KMS with Autokey will not be affected.
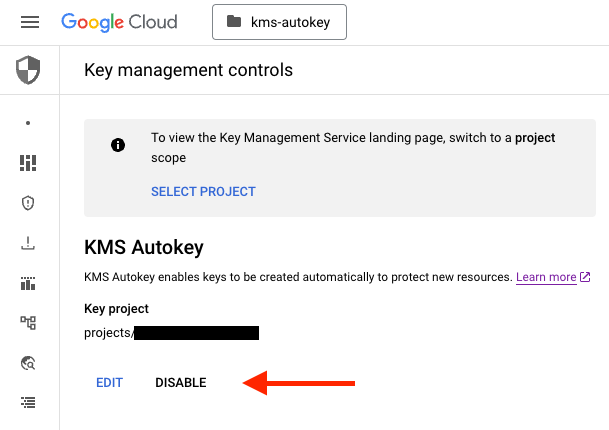
Disable to stop creating keys. Existing keys are not affected.
Optional Step 1: Revoke KMS Autokey Admin for the Folder
To revoke the Autokey Admin role:
gcloud resource-manager folders remove-iam-policy-binding FOLDER_ID --role=roles/cloudkms.autokeyAdmin --member=user:USER_EMAIL
This action revokes the autokeyAdmin role which prohibits the user from re-enabling or managing KMS autokey. However, it’s important to note that existing keys will continue to work, and any resources that were previously encrypted using these keys will remain secure.
Optional Step 2: Revoke Autokey User Roles
You can also revoke the Autokey user roles at the folder or project level. Here’s how to remove the roles/cloudkms.autokeyUser role:
gcloud resource-manager folders remove-iam-policy-binding FOLDER_ID - role=roles/cloudkms.autokeyUser - member=user:USER_EMAIL
If the service agent will no longer be needed, you can also revoke the service agent’s Cloud KMS Admin role:
gcloud projects remove-iam-policy-binding KEY_PROJECT_NUMBER - role=roles/cloudkms.admin - member=serviceAccount:service-KEY_PROJECT_NUMBER@gcp-sa-cloudkms.iam.gserviceaccount.com
**Have Questions?**
At DoiT International, our team is staffed exclusively with senior engineering talent. We specialize in advanced cloud consulting, architectural design, and debugging services. Whether you’re planning your first steps with distributed systems, optimizing an existing system, or troubleshooting complex issues, we provide tailored, expert advice to meet your needs.
Reach out today and let us help you unlock the full potential of your cloud infrastructure.
Cloud KMS with Autokey is a powerful tool that makes it easier to manage encryption keys in Google Cloud. By automating key creation and rotation, Autokey helps you enforce best practices for security, reduce the risk of human error, and scale encryption seamlessly across your infrastructure.
With KMS Autokey now in General Availability, it’s a great time to start using it in your organization. Whether you’re deploying new resources or ensuring that your existing workloads are protected, Cloud KMS with Autokey makes key management both simpler and more secure.
For detailed guides and references, check out the official documentation on KMS Autokey.