Putting the pieces together for your own ML pipeline
A lot of tutorials I find only cover a portion of an overall working solution. Some may show a Notebook (we’ll get to that later) with model training, prediction, and analysis. Others may show how to create an API to serve a model. I wanted to take a different approach and demonstrate how you might design an end-to-end application with the web app, API, and automatic model retraining based on user interactions.
Prerequisite: Demo Video
Read part 1 of this series to view the four-minute demo of the working application, and background on machine learning concepts and terminology. Next, we will explore steps I took to design and create the ML pipeline demo, and decisions along the way.
High-level solution design
I began with specific non-functional requirements about resource efficiency, scalability, and sub-second performance. Many prediction models could simply be served by an API program and do just fine. Here, however, I’ll illustrate how you could design a distributed serverless architecture using public cloud services and why one might choose this design.

Custom ML pipeline architecture (distributed serverless app hosted on public cloud)
If you’re a data scientist with a little software background, some of this may seem foreign to you — paybacks, ha! As you explore the source code repos and view actual code that relates back to the Notebook, hopefully, the puzzle pieces will fall into place and this is useful.
Start with a plan
If you don’t have a plan you may waste a lot of time. Similar to nailing boards together and hoping eventually you will make a building, it’s far more efficient to draw up plans, purchase materials, and then assemble. Designing software solutions is really no different, but different experience levels require different types of planning.
Architecture, UI, and API design
Just to prove I didn’t skip that step, below is a photo of some of my rough sketches I created over Thanksgiving break resulting in the architecture diagram you see above. I then built the demo app in my spare time during the month of December 2020.

Initial mockups of architecture, UI, and API interfaces for AI demo app
Choosing the correct machine learning algorithm
With the assistance of a DoiT International colleague (our team includes many AI gurus and Kaggle competition masters), I settled on designing a binary classifier using a Support Vector Machine (SVM) linear algorithm to train my model. This video below describes what it is, but don’t worry if it’s above your head at this point — how the algorithms work is not as important to understand at first, in my opinion.
If your data falls on one side of the line, it’s “bad” and other side, it’s “good”. That’s the basics.
Instead of using my real project, for now, I discovered a public dataset for this demo to build everything out with. I can later change the features to my project, add security, and other pieces required for an actual startup.
Chosen technology stack
Given I’ve held senior roles at various companies, I haven’t actively coded new software products in a while. I first spent a couple of days over Thanksgiving break retraining myself on current tools and software frameworks to land upon my chosen “stack”. For simplicity, we are ignoring DevOps automation but I may add in a future post.
- UI layer — NextJS/React + Chakra UI containers served by Cloud Run
- API layer — Golang + Go-Chi containers served by Cloud Run
- Messaging layer — Cloud Pub/Sub
- Caching layer— Cloud Memorystore (Redis)
- Processor layer — Python Cloud Functions with Pub/Sub trigger
- Database layer — Cloud SQL (Postgres)
- Storage layer— Cloud Storage Buckets
For protecting secrets like database passwords for the functions, the demo app uses Cloud Secret Manager. Normally I design things to be vendor agnostic but most of Google Cloud Platform’s managed solutions are based on open-source products so it is easier to “replace” them for OSS later. Adding more interfaces in my code can also simplify swapping out services.
“Show me the code”

He really said “show me the code” and “I love data science”
Source code and documentation
The following Github source code repositories contain the working code for the demo app you saw in part 1 of this series. Each repo includes a demo and documentation on where that component fits the overall architecture, and how you can install and run them yourself.
- Web UI — user-friendly interface to visualize how the system works
- Ingest API — where we submit batches of records we want predictions for
- Predict API — serves up batch predictions and receives user corrections
- Processors — async cloud functions that perform prediction, training, and data persistence tasks (also includes original Jupyter Notebook, trained model, dataset, and database schema files)
My next step (converting from demo app to real one) would be to refine code (more defensible), add automated testing, and pagination. I would then provision infrastructure with Terraform, refine the CI/CD pipeline, and front everything with an API Gateway to centralize authentication, logging, tracing, and rate-limiting. If I decide to open-source those steps, I’ll update this series with a “part 3”. ;-)
Comparison to commercial solutions
As you explore this article series and the Github source repos above, I hope you’ll begin to recognize the pieces and terms that seemed overwhelming at first. A great test is to look at this diagram from Google that describes their AI Platform managed solution. As you view the boxes, how many terms now make sense to you?
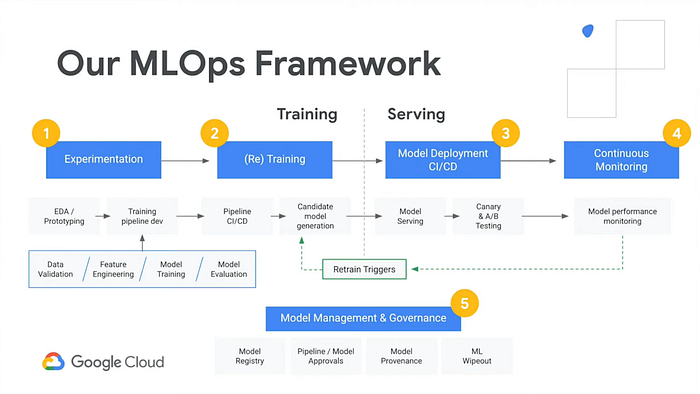
Exploring the demo app ai-demo-functions repo, you’ll find similar functionality:
- “Experimentation” — see notebook.ipynb
- “(Re) Training” — see /training/main.py
- “Model Deployment” and “Model Serving” — see /training/main.py , /prediction/main.py , and /prediction-to-cache/main.py
- “Continuous Monitoring” and “Retrain Triggers” — see /feedback-to-db/main.py and /feedback-to-training/main.py
- “Model Management & Governance” — see /training-to-cache/main.py and training-to-db/main.py
Performance
Often a key differentiator amongst solutions in the market is performance. Many design decisions were influenced by performance-based objectives.
Python or not?
In the Jupyter Notebook where I ran initial experiments, I measured the time each operation took to ensure the Python language and chosen libraries would meet my needs.
One such experiment was the prediction serving itself. I loaded the user input data in a Pandas DataFrame structure and ran my prediction and it took approximately 6 milliseconds. Luckily a colleague shared a tip that if I used a Numpy array, it may be faster and indeed reduced my prediction time down to 2 milliseconds — a win in my book.
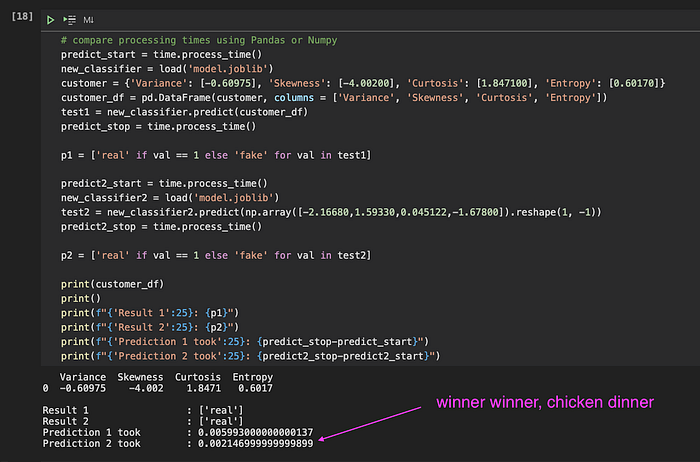
Comparing processing time (and memory consumption) between data structures
Serverless functions or not?
Another concern I had was cold start times for serverless functions and how fast they process. After experimenting with a few test functions, I discovered a way to preload libraries and drastically reduce prediction function execution time to approximately 8 milliseconds. All tests indicated that Python and Google Cloud Functions could meet my needs.
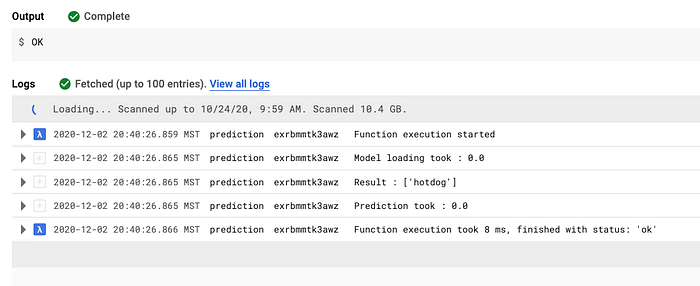
Early tests on Cloud Function prediction execution time (8 milliseconds)
If my model training times or dataset were different, I may make different decisions given fixed timeouts and memory limits, however.
- Cloud Functions — max 4Gb memory; max 9m execution time
- Cloud Run — max 8Gb memory; max 15m execution (60m in beta)
- Cloud Run (Anthos) — more memory; max 24h execution (gke 16+)
- longer-running jobs consider GKE or running container on VMs
Pro tips
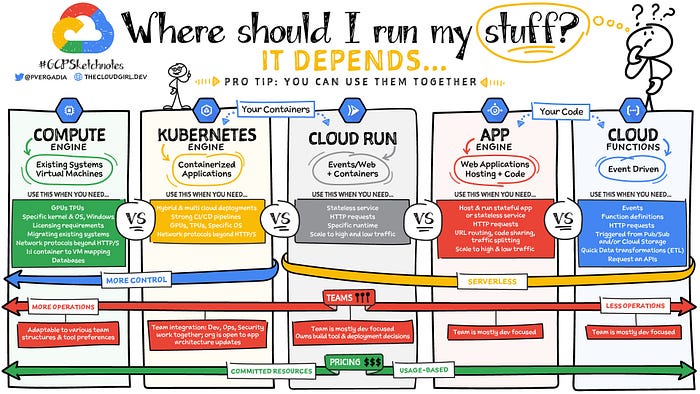
Source: Google (Priyanka Avergadia)
Containers for API or not?
I decided on Golang and Google Cloud Run for the API layer. I wanted to build something in Golang and it’s very fast with high concurrency using minimal resources like NodeJS. Also, the Docker image size is small so under load it can quickly autoscale. Finally, a strongly-typed language can help reduce “garbage in” providing a layer of defense before passing data to the dynamically-typed Python processors.
Using Apache Bench and playing with gzip compression, I was able to reduce the network transfer 82% and average 5.295 milliseconds per request from my home network in Montana, USA to Google’s us-central1 servers. Another colleague recommended Snappy which may reduce CPU costs yet still provide ample network optimization (trial/error to find the best combination).

Benchmarking API performance with and without compression

Analyzing cloud infra overhead and request latencies
React or not? At several companies, we used React library for the web UI layer, but for others we used Angular. I’ve been watching VueJS and others but selected React because I have more personal experience with it and it’s what we use at my current company. In the past, I’ve bootstrapped React apps using create-react-app but I’ve seen impressive reports of improved SSR performance and routing simplicity using NextJS.
Material UI or not?
I spent a couple of days trying out CSS frameworks like Material UI, Tailwinds, and eventually Chakra UI. In the past, I’ve used Semantic UI but wanted something that used newer styling techniques. Chakra won me over (for now) so that’s what this demo is built with.
Efficiency and affordability
Another competitive advantage a company can have is cost-efficiency. This can allow it to be more competitive than others while enjoying higher profit margins. As I’m often advising others on how to optimize their public cloud infrastructure, I thought I would put this to the test and see how efficient I could run an entire AI app stack, balancing human and technology needs.
After building and running this stack for a month, I’m pleased to share that this single environment with minimal load cost less than $80. Of course, multiple environments and increased usage will grow the cost over time. The serverless architecture and other decisions, like compressed data, and even the serialized data design (arrays vs hashes to eliminate redundant data), should keep operational costs quite low.
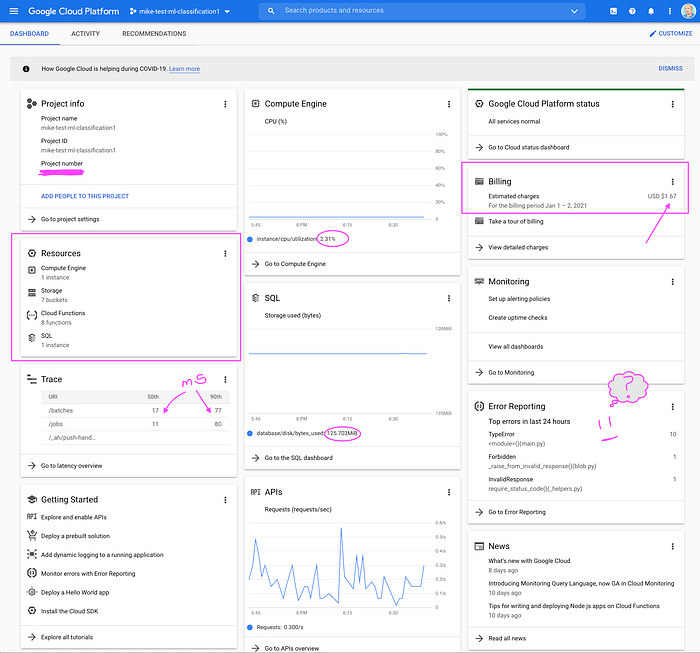
Single environment running a demo at very low cost (so far)
Next steps
As I mentioned in the first article, we skipped a lot of content normally covered in ML tutorials. This demo uses “supervised learning” and creates a “binary classifier” but we’ve all heard about neural networks, etc. which are different types of learning.
I intentionally eliminated this “noise” to allow initial focus on an overall understanding. As you continue your journey into AI and ML, here are a few useful resources to explore going forth to better understand the broader type of problems and solutions AI and ML can solve:
- Elements of AI(free online course from Helsinki University)
- Algorithm overview diagram (different types of tools and problems)
- Choosing the right algorithm (good diagrams of different types)
- Platform comparison
There are commercial solutions like Databricks, AI Platform, Sagemaker, or open-source solutions like ML Flow and Kubeflow. Each has its pros and cons, plus additional cost, points of failure, and learning curves.
I decided that to truly understand how to build an ML pipeline to serve and retrain predictions, it’s best to build the components yourself (like learning math by hand before relying on a calculator). I hope you enjoy these insights and this is just a small slice of your overall AI journey.
I’m grateful to work with a team of expert data scientists so as I learn more I’ll “pay it forward” with more articles like these. If you’d like to join our team at DoiT, please visit our careers page or hit me up with a message on Twitter or LinkedIn.