
In this article I will demonstrate how to setup an automatic failover for a EKS cluster to your disaster recovery (DR) region. Quick introduction for EKS and Route 53 as follows.
Amazon Elastic Kubernetes Service (EKS) is a fully managed service that allows you to run Kubernetes on AWS without having to install, operate, or maintain your own Kubernetes control plane or worker nodes. With EKS, you can leverage the power and flexibility of Kubernetes to deploy, manage, and scale your containerized applications across multiple AWS availability zones. EKS also integrates with many AWS services and features, such as IAM, VPC, CloudWatch, CloudFormation, and more, to provide a secure, reliable, and scalable Kubernetes platform.

Amazon Route 53 is a cloud-based DNS service that helps you to connect your users to your web applications and resources on AWS and the internet. Route 53 offers high availability, scalability, performance, and security for your DNS queries and responses. Route 53 also supports advanced features, such as health checks, traffic management, domain name registration, and DNSSEC. Route 53 can work with other AWS services, such as Elastic Load Balancing, CloudFront, S3, and more, to route your users to the optimal endpoint for your application.
In this article I will be launching two EKS clusters one in US-EAST-1 (Prod Region) and US-WEST-2 (DR Region). I using a custom domain for the production cluster thru Route 53. Then I will run a number 2048 game on both clusters and demonstrate the auto failover offered by Route 53 by introducing failures in production cluster. There are multiple ways like AWS Console, Terraform, Cloud Formation etc. to launch a EKS cluster, but I will use AWS console to keep it simple for better understanding for everyone. Below is a conceptual architecture diagram.
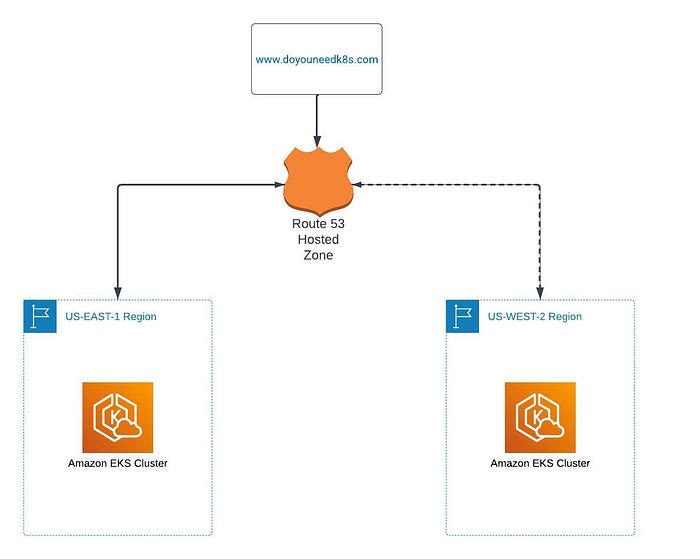
Conceptual Architecture
**Step 1: Create an EKS cluster**
I am going to show steps to launch the game in prod region us-east-1 and I have similar setup available in the us-west-2.
Name: eks-blog-production-us-east-1
Kubernetes Version: 1.25
Cluster Service Role: You need to create a role “ eksClusterRole” and make sure it has this 3 policies attached to it. AmazonEKSWorkerNodePolicy, AmazonEC2ContainerRegistryReadOnly and AmazonEKS_CNI_Policy.
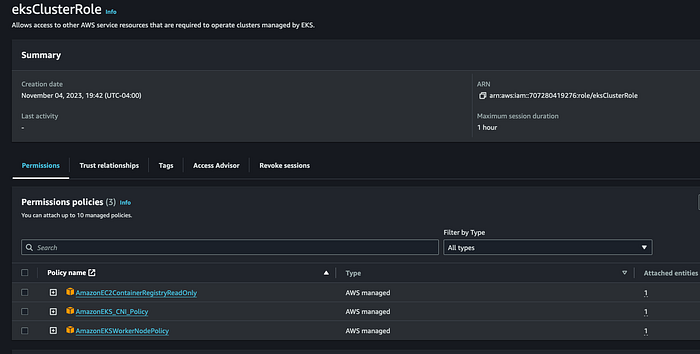
eksClusterRole
Select default VPC, Choose 2 or 3 subnets
Select a security group which has a ports 22, 80, 8080
Set Cluster endpoint access: public
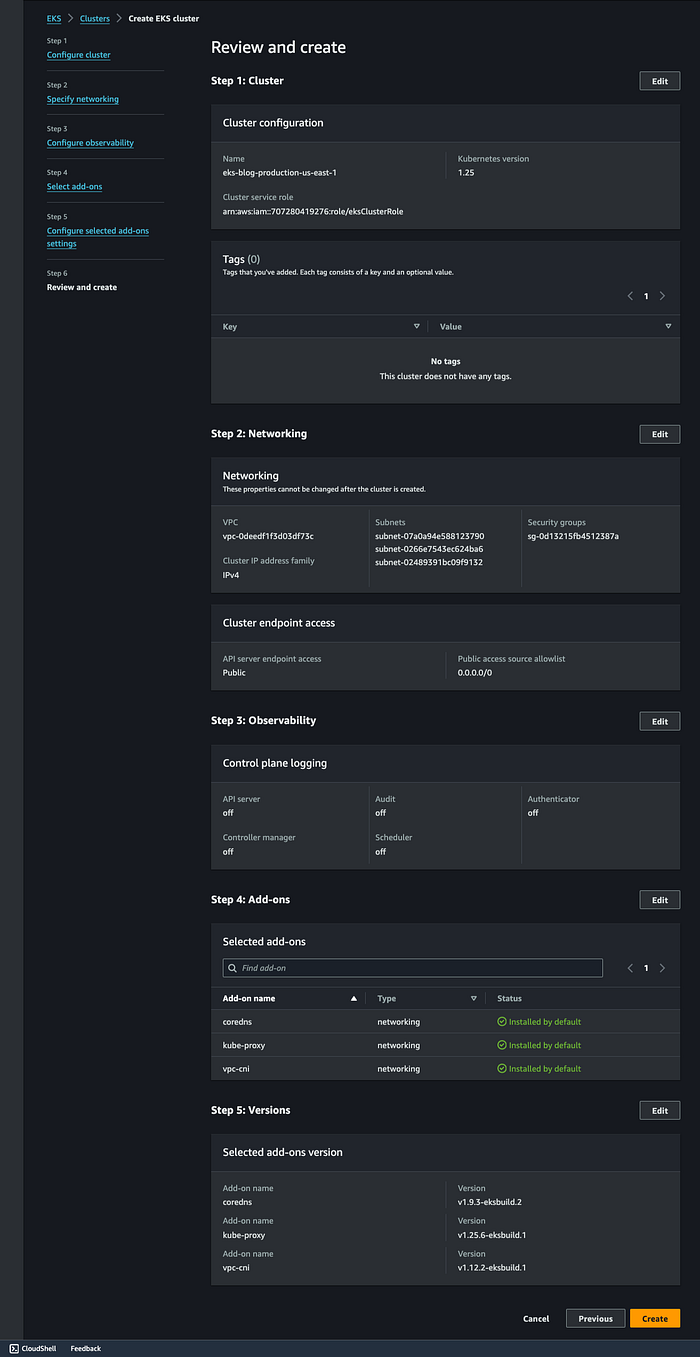
Full Cluster Detail Before Launch
Step 2: Add Node Groups to our cluster
Open the cluster > Compute > Add NodeGrp
Name: eks-blog-production-eks-nodegrp-1
Cluster Service Role: You need to create a role “ eksNodeRole” and make sure it has this 3 policies attached to it. AmazonEKSWorkerNodePolicy, AmazonEC2ContainerRegistryReadOnly and AmazonEKS_CNI_Policy.
Leave default values for everything else.
EKS Node Group
Step 3: Authenticate to this cluster
Open AWS Cloud shell and run below commands.
# Type on your AWS CLI window
aws sts get-caller-identity

# observe your account and user id details

# Create a  kubeconfig file where it stores the credentials for EKS:

# kubeconfig configuration allows you to connect to your cluster using the kubectl command line.

aws eks update-kubeconfig --region us-east-1 --name eks-blog-production-us-east-1

# see if you can get the nodes you created
kubectl get nodes
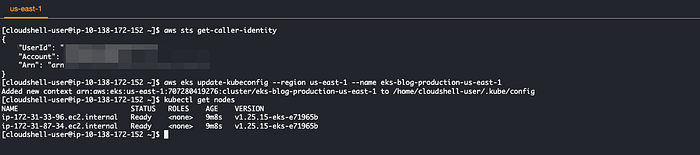
Command outputs
Step 4: Create a new POD in EKS for the 2048 game
Create below 2048-pod.yaml file to deploy the 2048 game pod in the cluster.
### code starts ###
apiVersion: v1
kind: Pod
metadata:
   name: 2048-pod
   labels:
      app: 2048-ws
spec:
   containers:
   - name: 2048-container
     image: blackicebird/2048
     ports:
       - containerPort: 80

### code ends ###
Apply the YAML file to create the pod
# apply the config file to create the pod
kubectl apply -f 2048-pod.yaml
#pod/2048-pod created

# view the newly created pod
kubectl get pods

2048 Pod Created
Step 5: Setup Load Balancer Service
Now we will setup a load balancer service by creating a service yaml file mygame-svc.yaml as below.
### code starts ###

apiVersion: v1
kind: Service
metadata:
   name: mygame-svc
spec:
   selector:
      app: 2048-ws
   ports:
   - protocol: TCP
     port: 80
     targetPort: 80
   type: LoadBalancer

### code ends ###
Apply the Load Balancer Service file.
# apply the config file
kubectl apply -f mygame-svc.yaml

# view details of the modified service
kubectl describe svc mygame-svc
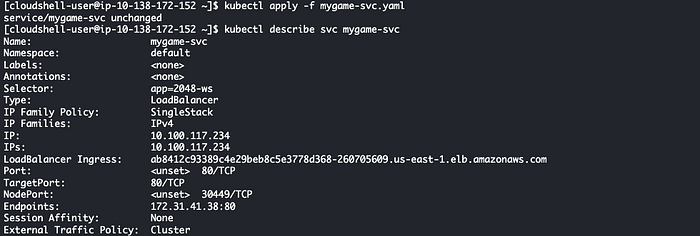
Load Balancer Service Created
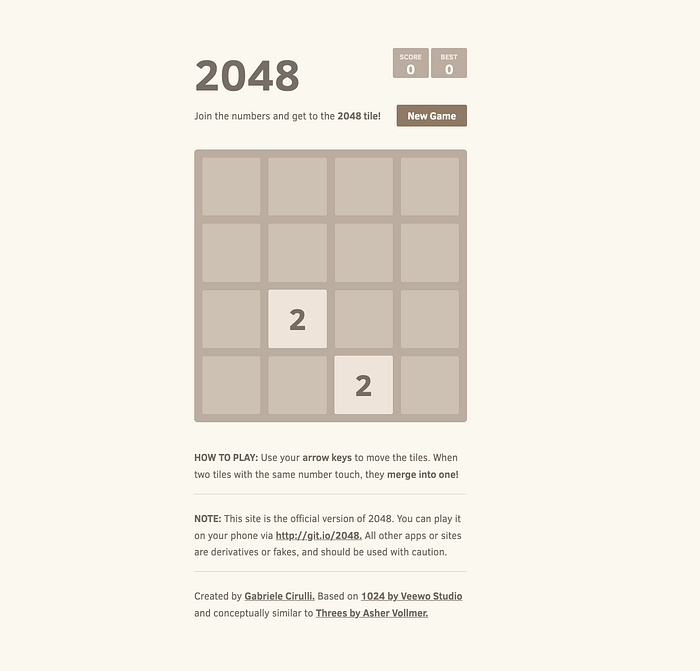
When you paste the endpoint of the Load Balancer “ab8412c93389c4e29beb8c5e3778d368–260705609.us-east-1.elb.amazonaws.com” in browser you will see the game loading.
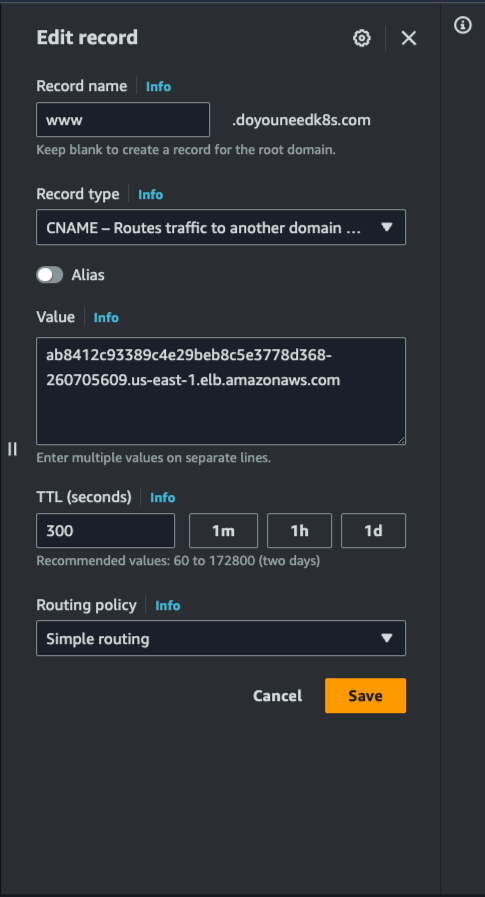
Step 6: Route domain [www.doyouneedk8s.com](http://www.doyouneedk8s.com/) to the game.
Go to Route 53 hosted zone for domain www.doyouneedk8s.com and add a Load Balancer Endpoint as a C-Name record. After the DNS record propagate when you paste the domain in browser you can see the game loading in the browser.
Route 53 C-Name
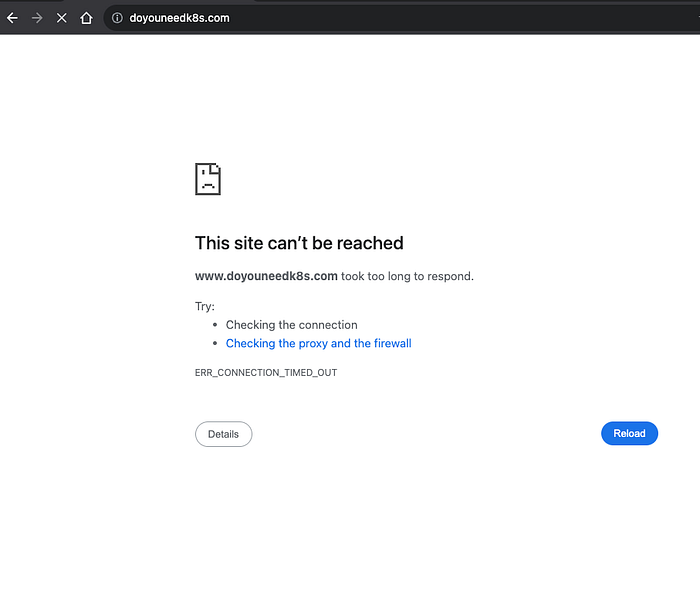
Step 7: Introduce Failure
Now lets say US Virginia has a outage. We will introduce manual failover for the application in US-EAST-1. I will remove the port 80 Inbound rule from the Load Balancer Security group. The game will stop loading. This is due to no failover available for the production application.
Step 8: Setup Route 53 Failover to DR Region
First this step you need to create a Health Check for your application for Route 53. Go to Route 53 and select “Health Checks” in left hand side navigation and click on “Create Health Check” button.
Name: www.doyouneedk8s.com
What to monitor: Endpoint
Monitor and endpoint > Select Domain Name > Add www.doyouneedk8s.com in Domain Name text box, Port 80
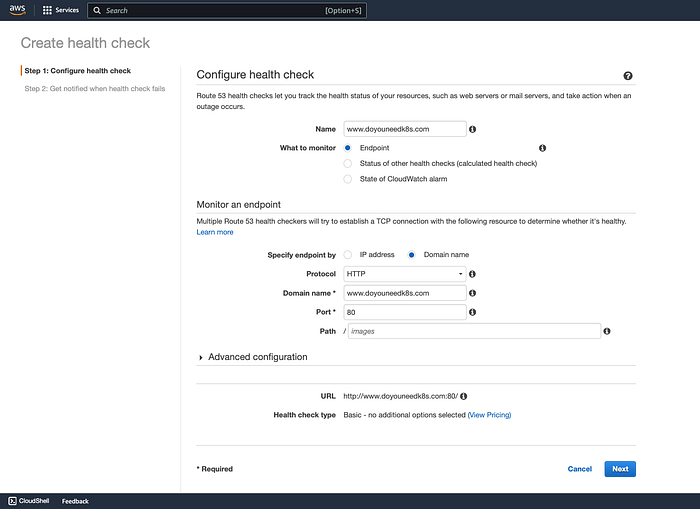
Create Health Check Page 1
After you click Next in the proceeding page you have a option to create an Alarm for this event so you can notified of this failover event. It is quiet simple you will need a verified SNS topic just select it. Select Yes in “Create Alarm”. Then Click “Create health check”
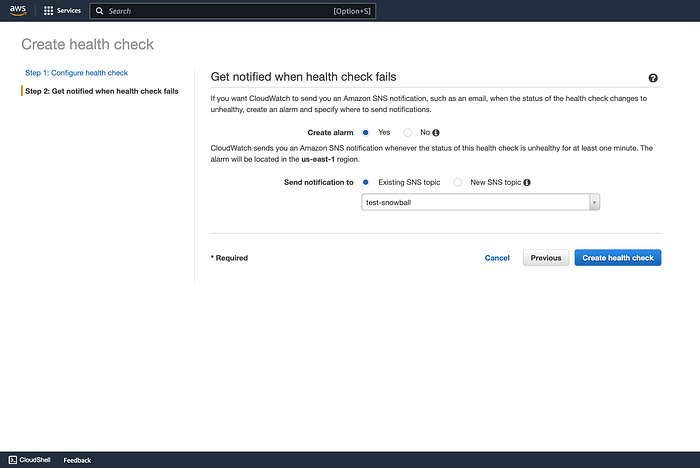
Create health check
You will see a green “Healthy” health check once the health check passes the set parameters.
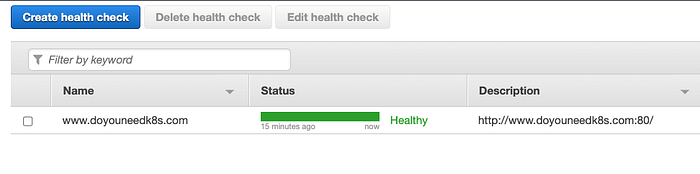
Health Check Ready To Use
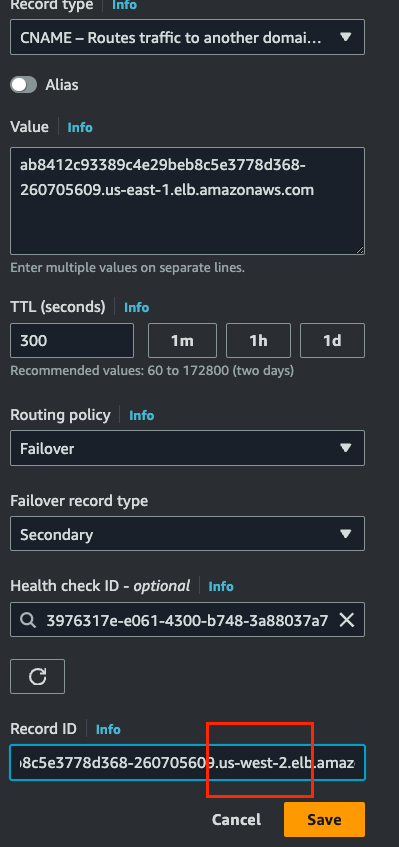
Go to the www.doyouneedk8s.com hosted Zone in Route 53. Select the C Name Record and under Routing Policy Select “Failover”.
Failover record type: Secondary
Health Check ID: The domain health check you create previously.
Record ID : The US-WEST-2 Load Balancer that was created when you launched the game in US Oregon region. Save the record.
Now it is time to test. Reintroduce the same failover as you did in Step 7 above. And you will see this time the Game keep working. To demonstrate this I have added a different text in the game page so we know the game is being served from the DR region this time.

DR Failover Successful
Conclusion:
Route 53 is really powerful tool offered by AWS for creating robust DR and Business Continuity Strategies. In the above article I have demonstrated the concept on how you achieve the failover but to keep both the Production and DR Clusters in sync with code updates is on to you. Also if you set up the above failover strategy you need to perform a sanity test regularly in maintenance windows to see if both applications Prod and DR perform properly.