
Empowering Enterprise Developer Productivity with Secure, Self-Hosted AI Coding Assistants on Amazon SageMaker
Introduction and Context
AI-assisted coding has significantly transformed software development by automating routine tasks, enhancing accuracy, and allowing developers to focus more on complex problem-solving. Enterprises increasingly prefer hosting their LLM models in private environments, primarily to safeguard sensitive intellectual property and proprietary code, comply with data regulations, and enable customization for specific organizational needs.
Overview
In this blog, we will host a marketplace LLM in your Amazon SageMaker environment. We will use a model from Amazon SageMaker Jumpstart. Most AI-powered autonomous coding agents, such as Roo Code, Cline, and Continue.dev, support open protocols like OpenAI, making LiteLLM an ideal OpenAI proxy for our SageMaker inference.
Why Self-Hosted LLM Models?
Companies benefit from self-hosted LLM models for:
- Data Privacy and Security: Hosting internally ensures sensitive data, source codes, and proprietary algorithms are secure.
- Customization: Tailoring AI models to specific coding styles, business logic, and regulatory requirements.
- Cost Optimization: Efficient management and optimization of resources reduce costs compared to third-party AI services.
Productivity and Example Use Cases
AI-assisted coding boosts productivity and efficiency across software development processes, such as:
- Automating boilerplate code generation
- Assisting in debugging and identifying performance bottlenecks
- Enhancing code review processes
- Accelerating onboarding and training for new developers
Important Considerations
- Security and Compliance: Proper configuration of IAM roles, encryption, and access controls.
- Cost Management: Regular monitoring and optimization of infrastructure usage.
- Performance Optimization: Choose suitable SageMaker instance types based on specific workload demands.
Amazon SageMaker’s Role in Self-Hosting
Amazon SageMaker simplifies self-hosting by offering:
- Access to a wide range of pre-trained LLMs through SageMaker Jumpstart.
- Scalable, secure, and high-performance infrastructure management.
- Smooth integration within AWS services, reducing operational complexity.
Benefits of Using Fargate
Using AWS Fargate for deploying the LiteLLM proxy significantly reduces operational overhead by:
- Eliminating the need for manual infrastructure management and server maintenance.
- Automatically handling scaling and availability, ensuring consistent performance.
- Reducing security management complexity through isolation and AWS-managed environments.
Architecture
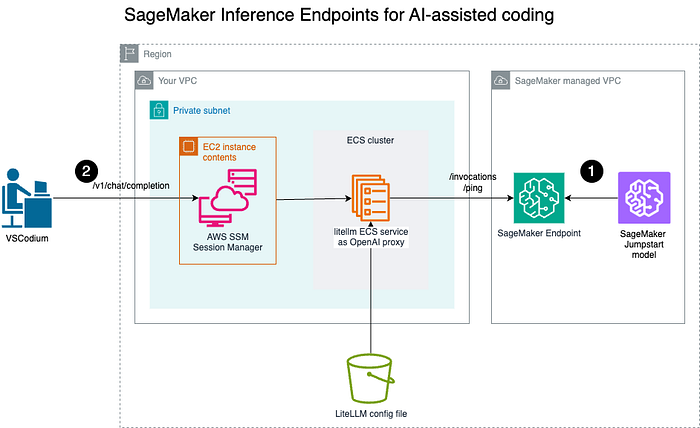
- Deploy a model to the Amazon SageMaker endpoint for real-time inference;
- Engineers using AI-powered coding assistants in local IDEs, such as VSCodium, connect securely to the LiteLLM OpenAI proxy via a secured channel to invoke the LiteLLM OpenAI Proxy.
Overview of steps
First, we will deploy a pre-trained model as the Amazon SageMaker endpoint. Then, we will run an OpenAI proxy with LiteLLM as an ECS service.
Developers can now connect to the OpenAI proxy. For simplicity, this tutorial will connect via the public IP of the ECS task.
Step 1: Deploy a pre-trained model to Amazon SageMaker
Prerequisite: Before we provision an Amazon SageMaker endpoint, you might need to make sure your account has a quota of at least 1 for the instance to be used for the endpoint, which you can check on https://console.aws.amazon.com/servicequotas/home/services/sagemaker/quotas. We will be using ml.g5.12xlarge , so you will need at least 1 for your account. Otherwise, you can raise a request by selecting “Request increase at account level.”

- If you don’t have an existing Amazon SageMaker execution role ( https://docs.aws.amazon.com/sagemaker/latest/dg/sagemaker-roles.html), create an IAM role for the SageMaker execution and let’s call it
AmazonSageMaker-Endpoints-ExecutionRole, attach the managed policyarn:aws:iam::aws:policy/AmazonSageMakerFullAccessand trust policy forsagemaker.amazonaws.com:
{
    "Version": "2012-10-17",
    "Statement": [\
        {\
            "Effect": "Allow",\
            "Principal": {\
                "Service": "sagemaker.amazonaws.com"\
            },\
            "Action": "sts:AssumeRole"\
        }\
    ]
}
2. Identify the VPC, the private Subnets, and the Amazon SageMaker endpoint that will be deployed.
3. Create an S3 VPC endpoint so that the Amazon SageMaker endpoint can download the pre-trained model from the S3 bucket:
aws ec2 create-vpc-endpoint \
    --private-dns-enabled \
    --vpc-id <vpc-id> \
    --service-name com.amazonaws.<region>.s3 \
    --route-table-ids <route-table-id>
If the command is executed successfully, the route table should have the VPC Endpoint along with the NAT, such as
% aws ec2 describe-route-tables --route-table-ids <route-table-id> --query 'RouteTables[*].Routes'
[\
    [\
        {\
            "DestinationCidrBlock": "10.0.0.0/23",\
            "GatewayId": "local",\
            "Origin": "CreateRouteTable",\
            "State": "active"\
        },\
        {\
            "DestinationCidrBlock": "0.0.0.0/0",\
            "NatGatewayId": "nat-<NAT GW ID>",\
            "Origin": "CreateRoute",\
            "State": "active"\
        },\
        {\
            "DestinationPrefixListId": "pl-63a5400a",\
            "GatewayId": "vpce-<VPCE ID>",\
            "Origin": "CreateRoute",\
            "State": "active"\
        }\
    ]\
]
3. Create a Security Group ecs-sagemaker-endpoint with the following :
Inbound rule:
- Protocol: HTTPS (443)
- Source: The security group itself (self-referential)
Outbound rule
- Protocol: HTTPS (443)
- Destination: S3 VPC endpoint
Note: As a cybersecurity good practice, default Security Group should not allow any inbound or outbound rules. Details can be found at https://docs.aws.amazon.com/securityhub/latest/userguide/ec2-controls.html#ec2-2
- Identify your model from Amazon SageMaker Jumpstart (e.g., Qwen2, Mistral, Llama 3.2). The list of pre-trained models can be found at https://sagemaker.readthedocs.io/en/stable/doc_utils/pretrainedmodels.html .

2. Note the Model ID and version to create an Amazon SageMaker model:
from sagemaker.jumpstart.model import JumpStartModel
jump_start_model = JumpStartModel(
    model_id="huggingface-llm-qwen2-7b-instruct",
    model_version="1.2.0",
    role="AmazonSageMaker-Endpoints-ExecutionRole",# or the relevant Amazon SageMaker execution role
    vpc_config={
        "Subnets": [ "Private Subnets" ],
        "SecurityGroupIds": [ "ecs-sagemaker-endpoint" ]
    },
)
jump_start_model.deploy(
    initial_instance_count=1,
    instance_type="ml.g5.12xlarge",
    accept_eula=True,
    endpoint_name="jumpstart-model"
)
Confirm your endpoint status using AWS CLI:
% aws sagemaker list-endpoints
{
    "Endpoints": [\
        {\
            "EndpointName": "jumpstart-model",\
            "EndpointArn": "arn:aws:sagemaker:<AWS REGION>:<AWS ACCOUNT ID>:endpoint/jumpstart-model",\
            "CreationTime": "<CreationTime>",\
            "LastModifiedTime": "<LastModifiedTime>",\
            "EndpointStatus": "InService"\
        }\
    ]
}
Step 2: Deploy the OpenAI Proxy using Amazon Elastic Container Service (ECS)
Details on how to configure LiteLLM prox can be found in https://docs.litellm.ai/docs/proxy/configs
- Create a configuration YAML file (
config.yaml) to map the SageMaker endpoint:
model_list:
  - model_name: jumpstart-model
    litellm_params:
      model: sagemaker/jumpstart-model # uses sagemaker namespace, and point to the Amazon SageMaker endpoint name
2. Upload config.yaml to an S3 bucket.
3. Define your ECS container (container-definition.json):
[\
    {\
        "name": "litellm",\
        "image": "ghcr.io/berriai/litellm:main-latest",\
        "cpu": 0,\
        "portMappings": [\
            {\
                "containerPort": 4000,\
                "hostPort": 4000,\
                "protocol": "tcp"\
            }\
        ],\
        "essential": true,\
        "environment": [\
            {\
                "name": "LITELLM_CONFIG_BUCKET_OBJECT_KEY",\
                "value": "config.yaml"\
            },\
            {\
                "name": "LITELLM_CONFIG_BUCKET_NAME",\
                "value": "<S3 bucket>"\
            },\
            {\
                "name": "LITELLM_MASTER_KEY",\
                "value": "<API key to call the proxy, such as sk-123123>"\
            }\
        ],\
        "mountPoints": [],\
        "volumesFrom": [],\
        "logConfiguration": {\
            "logDriver": "awslogs",\
            "options": {\
                "awslogs-group": "/ecs/litellm",\
                "awslogs-create-group": "true",\
                "awslogs-region": "us-east-1",\
                "awslogs-stream-prefix": "ecs"\
            }\
        },\
        "systemControls": []\
    }\
]
3. Create an IAM role for the ECS task role with the least privilege as below:
{
    "Version": "2012-10-17",
    "Statement": [\
        {\
            "Sid": "Statement1",\
            "Effect": "Allow",\
            "Action": [\
                "sagemaker:InvokeEndpoint"\
            ],\
            "Resource": [\
                "arn:aws:sagemaker:<AWS REGION>:<AWS ACCOUNT ID>:endpoint/jumpstart-model"\
            ]\
        }\
    ]
}
4. Register the ECS task definition:
aws ecs register-task-definition \
    --family litellm-task \
    --requires-compatibilities FARGATE \
    --cpu 1024 \
    --memory 2048 \
    --network-mode awsvpc \
    --runtime-platform cpuArchitecture=ARM64 \
    --task-role-arn "<ECS Task Role ARN>" \
    --container-definitions file://./container-definition.json \
    --region $REGION
Before creating the ECS service, we need these settings:
- The subnet ID in which the ECS tasks will be running.
- The Security Group allows the ECS tasks to connect to the Amazon SageMaker endpoints. This article was created as
ecs-sagemaker-endpoint
We also need to create a security group for the ECS tasks to download the LiteLLM container image:
Outbound rule
- Protocol: HTTPS (443)
- Destination: 0.0.0.0/0
- Description: ECS Tasks image download
Another Security Group for the proxy to the ECS tasks:
Inbound rule:
- Protocol: LiteLLM port (4000)
- Source: The security group itself (self-referential)
Outbound rule
- Protocol: LiteLLM port (4000)
- Destination: This security group itself (self-referential)
- Description: Proxy and the ECS tasks
Create an ECS service with the task definition with the Subnet ID:
aws ecs create-service \
    --cluster litellm-cluster \
    --service-name litellm-service \
    --task-definition litellm-task:1 \
    --desired-count 1 \
    --launch-type FARGATE \
    --platform-version LATEST \
    --network-configuration "awsvpcConfiguration={subnets=[<SUBNET ID>],assignPublicIp=DISABLED},securityGroups=[<sg-xxx for ecs-sagemaker-endpoint>,<sg-xxx for ecs-443-outbound>,<sg-xxx for proxy-ecs-4000>]" \
    --region $REGION
Note: As a good cybersecurity practice, ECS services should not have public IP addresses. Details can be found in https://docs.aws.amazon.com/securityhub/latest/userguide/ecs-controls.html#ecs- 2
Retrieve the ECS task private IP:
CLUSTER="litellm-cluster"
# step 1: get the ECS task id
TASK=$(aws ecs list-tasks --cluster ${CLUSTER} --query "taskArns[0]" --output text)
# step 2: get the eni from from the ECS task
ENI=$(aws ecs describe-tasks --cluster $CLUSTER --tasks $TASK --query "tasks[0].attachments[0].details[?name=='networkInterfaceId'].value | [0]" --output text)
# step 3: get the public ip address of the ENI
aws ec2 describe-network-interfaces --network-interface-ids $ENI --query 'NetworkInterfaces[0].PrivateIpAddress' --output text
Take note of the task private IP, which will be used in the proxy setting.
Step 3: Setup a proxy
In this example, we will be setting up an EC2 in the same private subnet, to be managed by Amazon System Manager, in order for us to connect to the LiteLLM proxy via SSM port forwarding.
- Create a new Security Group,
ssm-outbound-sg, to allow outbound 443 connections:
Outbound rule
- Protocol: HTTPS (443)
- Destination: 0.0.0.0/0
- Description: SSM endpoint connections
- Create three VPC endpoints for the EC2 in the private subnet to connect to SSM endpoints
# Systems Manager endpoint
aws ec2 create-vpc-endpoint \
    --vpc-id <vpc-id> \
    --vpc-endpoint-type Interface \
    --service-name com.amazonaws.<region>.ssm \
    --subnet-ids <private subnet-id that the EC2 will be provisioned> \
    --security-group-ids <security-group-id for EC2 to connect to, such as ec2-ssm>

# SSM Messages endpoint
aws ec2 create-vpc-endpoint \
    --vpc-id <vpc-id> \
    --vpc-endpoint-type Interface \
    --service-name com.amazonaws.<region>.ssmmessages \
    --subnet-ids <private subnet-id that the EC2 will be provisioned> \
    --security-group-ids <security-group-id for EC2 to connect to, such as ec2-ssm>

# EC2 Messages endpoint
aws ec2 create-vpc-endpoint \
    --vpc-id <vpc-id> \
    --vpc-endpoint-type Interface \
    --service-name com.amazonaws.<region>.ec2messages \
    --subnet-ids <private subnet-id that the EC2 will be provisioned> \
    --security-group-ids <security-group-id for EC2 to connect to, such as ec2-ssm>
- Create a Graviton EC2, such as t4g.small, with Amazon Linux, in the private subnet.
- Attach these security groups to this EC2:
- Litellm-proxy that allows outbound port 4000 to the same security group so that this proxy EC2 can connect to the ECS task
ssm-outbound-sgto allow EC2 to connect to the SSM endpoints
3. Once the EC2 is ready, connect using the SSM agent with port forwarding:
aws ssm start-session \
--target <EC2 instance ID, such as i-012345> \
--document-name AWS-StartPortForwardingSessionToRemoteHost \
--parameters host="<ECS Task pivate IP>",portNumber="4000",localPortNumber="4000"
Step 4: Configure AI-Assisted Coding Environment
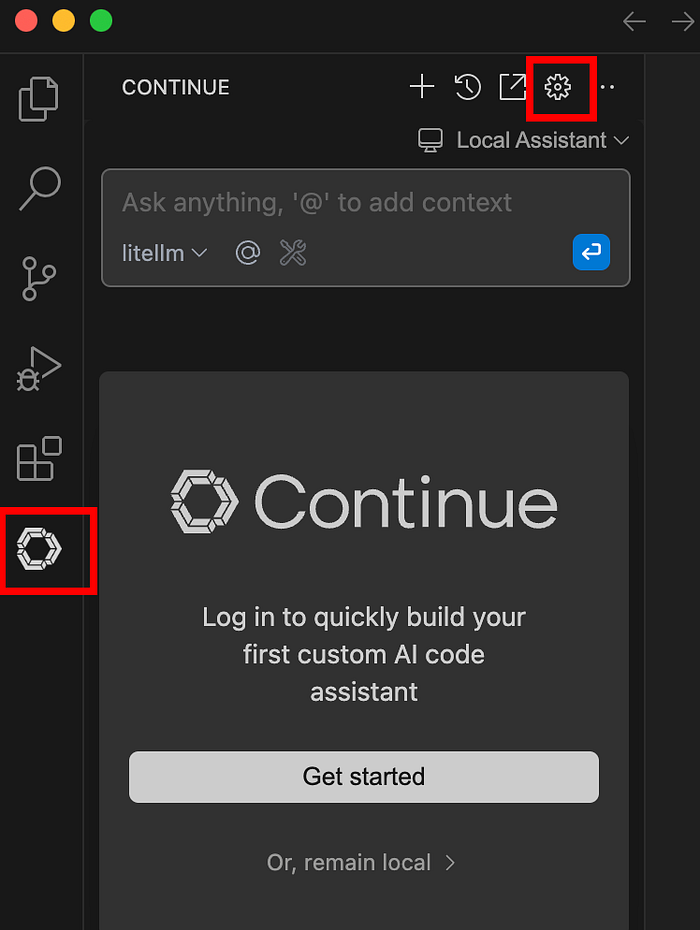
Install Continue.dev from the marketplace, such as https://open-vsx.org/extension/Continue/continue, and open up the local config.
Configure the newly created ECS tasks as a model provider:
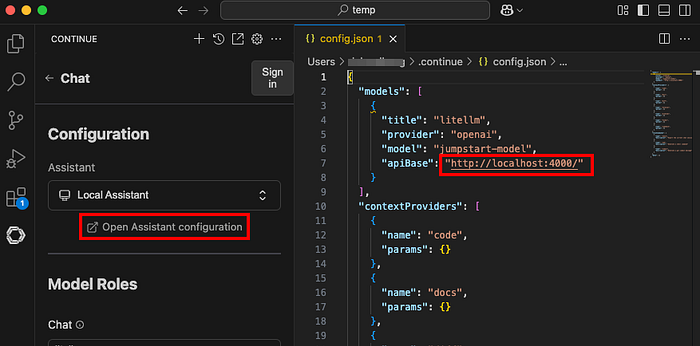
  "models": [\
    {\
      "title": "litellm",\
      "provider": "openai",\
      "model": "jumpstart-model",\
      "apiBase": "http://localhost:4000/",\
    }\
  ],
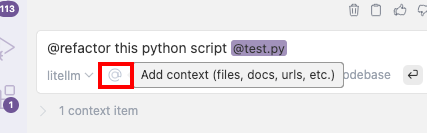
Once the configuration is updated, you can attach a file for AI to assist you.
NOTE: A secured connection from the engineer's laptop to the LiteLLM proxy endpoint, such as the use of AWS Client VPN, is strongly recommended.
Conclusion and Call to Action
Hosting your LLM model on Amazon SageMaker empowers enterprises with unmatched control, robust data privacy, and significant productivity improvements in software development. DoiT International can expertly guide your enterprise through the complexities of designing and implementing self-hosted, secure, and cost-effective AI solutions tailored specifically to your needs.
Ready to enhance your coding capabilities securely? Contact DoiT International today to discuss your Enterprise AI strategy and ensure robust data privacy and compliance.