
Enterprises seek methods to offer more secure authentication and a better user experience. Furthermore, they must have centralised user Authentication and Authorization without replicating user credentials and authorisation in another Identity provider (IDP).
This blog will show how to set up Auth0 as a SAML 2.0 provider federated with an existing enterprise Active Directory as Single Sign-On to Stream Amazon Workspaces.
Auth0 identity and management platform provides greater control, superior security, and ease of use. It delivers Single Sign-On (SSO) functionality through multiple pathways, such as enterprise federation, social sign in, or traditional username and password authentication. This means your users can effortlessly sign in just once and gain access to all the applications available to them.
High-level Architecture
Below is an overview of what is set up in the environment. We have set up everything in one VPC as below to keep the configuration simple.
- Domain controllers in Private Subnet.
- AWS Directory Service setup with AD Connector.
- Nat Gateways are set up in a public subnet so domain controllers can communicate to Auth0.
- Amazon Workspaces Setup in a Private Subnet.
Walkthrough
There are six steps that we need to perform to complete the configuration.
- Create an App in Auth0 and generate a Metadata manifest.
- Create a SAML Identity Provider in AWS Identity and Access Management (IAM).
- Create a SAML 2.0 Federation IAM Role and IAM Policy.
- Configuring Auth0 and SAML assertions.
- Enabling SAML 2.0 Integration in your workspaces directory.
- Test your configuration.
Prerequisites
- Auth0 Account with Active directory connector configured.
- Active Directory Connector for AWS Directory Service Configured.
- A provisioned Amazon Workspace within the same directory.
Step 1: Create an App in Auth0 and generate a Metadata manifest.
- Sign in to Auth0 Management Dashboard and create a new Application.
- On the Addons tab, enable the SAML2 Web App addon.
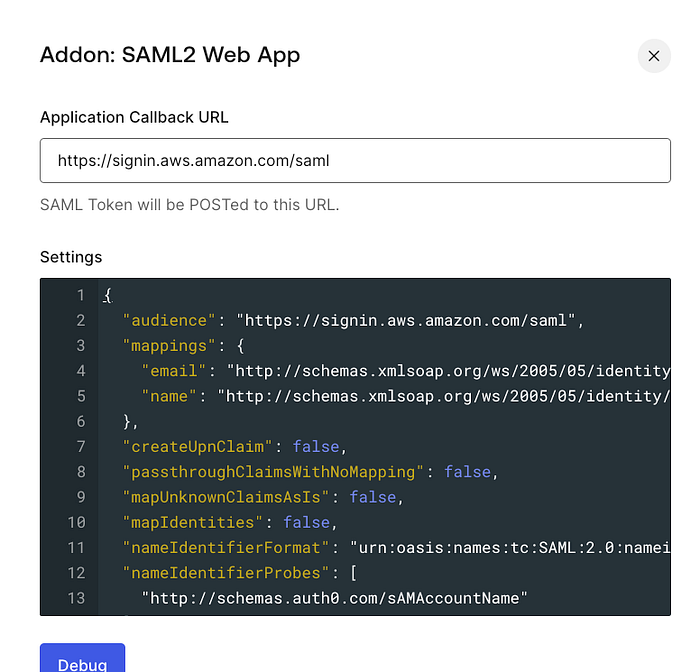
- Configure this addon using the pop-up that appears after you’ve enabled the SAML2 Web App. On the Settings tab, populate the Application Callback URL with https://signin.aws.amazon.com/saml and paste the following SAML configuration code in JSON format into Settings:
{
 "audience": "https://signin.aws.amazon.com/saml",
 "mappings": {
   "email": "http://schemas.xmlsoap.org/ws/2005/05/identity/claims/sAMAccountName",
   "name": "http://schemas.xmlsoap.org/ws/2005/05/identity/claims/name"
 },
 "createUpnClaim": false,
 "passthroughClaimsWithNoMapping": false,
 "mapUnknownClaimsAsIs": false,
 "mapIdentities": false,
 "nameIdentifierFormat": "urn:oasis:names:tc:SAML:2.0:nameid-format:persistent",
 "nameIdentifierProbes": [\
   "http://schemas.auth0.com/sAMAccountName"\
 ]
}
- Scroll to the bottom and click Enable.
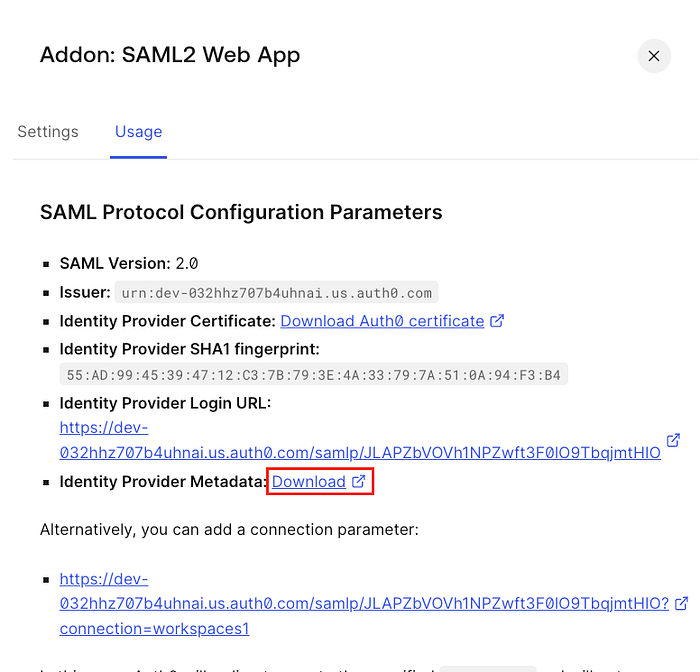
- Click on the Usage tab to download the metadata manifest file. The manifest file will be needed in the next step.
- Close the SAML2 Web App window, then click over Connections. Under Enterprise, select the correct Active Directory/LDAP Connector.
Step 2: Create a SAML Identity Provider in AWS Identity and Access Management (IAM).
- Sign in to your AWS Account and Open the IAM console.
- In the navigation pane, click Identity Providers and then click Add Provider.
- For Provider Type, choose SAML, provide a meaningful name and add tags as necessary. For Metadata Document, click Choose File, specify the SAML metadata document you downloaded in the previous step, and click Open. Once done, click Add Provider on the bottom of the screen.
- Verify the information that you have provided, and click Create.
- Keep a note of the ARN of this Provider, as you would need this in step 4.
Step 3: Create an IAM Role and IAM Policy for SAML 2.0 Federation
- In the navigation pane, click Roles and then click Create Role.
- For the Role type, Choose SAML 2.0 federation.
- Select the SAML Provider that was created in the last step.
- Select SAML:sub_type for Attribute. For Value, type persistent. This step restricts role access to only SAML user streaming requests that include a SAML subject type assertion with a value of persistent.
- Review your SAML 2.0 trust information, confirming the correct trusted entity and condition, and then choose Next: Permissions.
- On the Attach permissions policies page, choose Next: Tags.
- When you’re done, choose Next: Review. You create and embed an inline policy for this role later.
- For the Role name, type a name that helps you identify the purpose of this role. Because various entities might reference the role, you cannot edit its name after it has been created.
- (Optional) For Role description, type a description for the new role.
- Review the role details and choose Create role.
- Select the role you created, then choose Trust relationships, and Edit trust relationship.
- Update the action to allow sts:TagSession.
The Policy should look like below.
{
   "Version": "2012-10-17",
   "Statement": [\
      {\
         "Effect": "Allow",\
         "Principal": {\
            "Federated": "arn:aws:iam:::saml-provider/name"\
         },\
         "Action": [\
            "sts:AssumeRoleWithSAML",\
            "sts:TagSession"\
         ],\
         "Condition": {\
            "StringEquals": {\
               "SAML:sub_type": "persistent"\
            }\
         }\
      }\
   ]
}
The next step is to embed an Inline Policy to the role that we just created.
- Select the IAM role we created and in the permissions tab. Click Add Permissions->Create Inline Policy.
- Choose the JSON tab and paste the below policy. Update the region, Account ID and directory ID as per your configuration.
{
   "Version": "2012-10-17",
   "Statement": [\
       {\
           "Effect": "Allow",\
           "Action": "workspaces:Stream",\
           "Resource": "arn:aws:workspaces:<region>:<account-id>:directory/<directory-id>",\
           "Condition": {\
               "StringEquals": {\
                   "workspaces:userId": "${saml:sub}"\
               }\
           }\
       }\
   ]
}
Make sure to update the region, account ID and directory ID.
- Once done, click next, give your policy a name and Click Create Policy.
Step 4: Configuring Auth0 and SAML assertions.
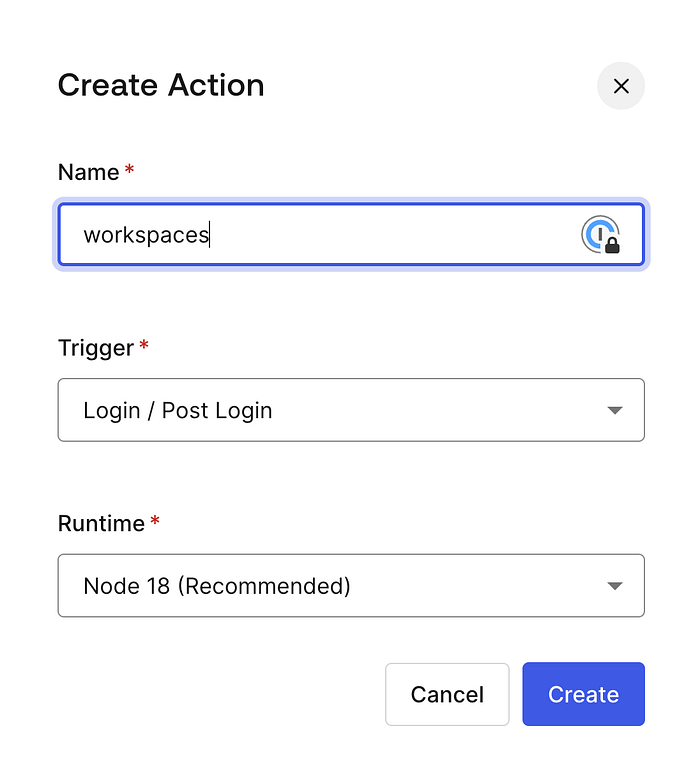
- Sign in to Auth0 Management Dashboard, go to Actions->Library-> Build Custom
- Give it a Name, Keep trigger as Login/Post Login and runtime as Node 18 and Click Create.
- On the Next Screen Copy Paste below Code an Click Deploy.
exports.onExecutePostLogin = async (event, api) => {
  if (event.client.name === "APP_NAME") {
    const awsRole = 'IAM_arn,saml_provider_arn';
    const awsRoleSession = event.user.sAMAccountName;
    const email = event.user.emails[0];
    api.samlResponse.setDestination('https://signin.aws.amazon.com/saml');
    api.samlResponse.setAttribute('https://aws.amazon.com/SAML/Attributes/Role', awsRole)
    api.samlResponse.setAttribute('https://aws.amazon.com/SAML/Attributes/RoleSessionName', awsRoleSession)
    api.samlResponse.setAttribute('https://aws.amazon.com/SAML/Attributes/PrincipalTag:Email', email)
}
return;
};
Replace App_Name with the name of the Auth0 App you created in step 1. Then replace IAM_arn with the IAM role arn created in step 3 and replace saml_provider_arn with saml provider arn created in step 2.
- Once Completed go to Actions->Library-> Flows and Click Login.
- On the Right Pane under Add Action, click Custom and move the action you created between Start and Complete.
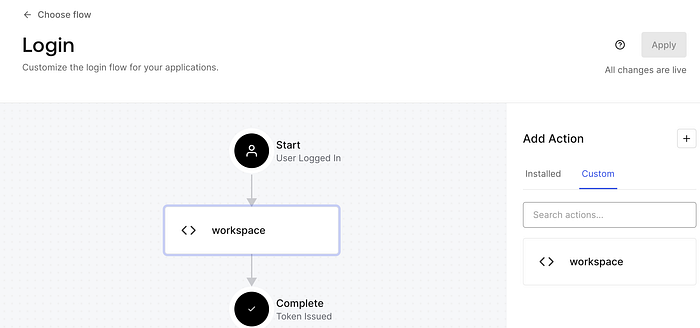
- Click Apply.
Step 5: Enabling SAML 2.0 Integration in your workspaces directory.
This is the final step to finish the configuration.
- Sign in to AWS Management Console and then Worksapces-> Directories.
- Click on the directory used by your workspaces.
- Click on Edit Authentication.
- Within the edit authentication screen, click Edit SAML 2.0 Identity Provider.
- Click on Enable SAML 2.0 Authentication; provide your Identity Provider Login URL in the User Access URL. You can keep the IdP deep link parameter name as “RelayState”.
Step 6: Test your configuration.
- Open your Amazon Workspaces Client to test this configuration and provide your registration code. You should see something similar to below.
- Click on Continue to sign in to Workspaces; this will redirect you to your IDP sign in page, which will look below.
- Sign in with your AD username and password; on successful authentication, you should see something like below.
- Click on Open Workspaces, and you should see the sign in screen with your username Pre-filled in.
- Enter your password, and you will see the workspace is being started.
- Once the workspace is started, the desktop should load up.
