DoiT Cloud Intelligence™
Unlock Powerful Progressive Delivery with Gateway API and Argo rollouts

In today’s fast-paced software delivery environment, innovation must go hand in hand with reliability. Progressive delivery enables teams to release features safely, gradually, and controlled. In a dynamic environment such as Kubernetes, progressive delivery plays a key role in maintaining service stability while driving continuous innovation.
If you’re familiar with tools like Argo Rollouts, you know how effectively they manage these staged deployments. Argo Rollouts optionally use a traffic provider to split traffic between pods with full control and in a gradual way.
Until recently, integrating a new traffic provider into Argo Rollouts required ad-hoc code support. However, two recent developments have rendered this process obsolete.
- The first is the Argo Rollouts traffic plugins support since version 1.5.
- The second is the new Kubernetes Gateway API,which offers fine-grained control over traffic routing and unlocks new capabilities for service mesh, ingress, and beyond.
With the adoption of the Gateway API in Argo Rollouts, the integration becomes much easier as any traffic provider that implements the Gateway API will automatically be supported by Argo Rollouts. The Gateway API website provides a list of known implementations.
In this blog, we will explore how to use the Gateway API with Argo Rollouts features in Google Kubernetes Engine for progressive delivery.
Prerequisites
- A GKE Cluster with Gateway API enabled.
- Argo Rollouts installed on the cluster.
- Install the kubectl plugin to manage and visualize rollouts from the command line.
Limitations
- The Argo Rollouts Gateway API plugin does not support the blue/green deployment strategy.
- This feature is only available for envoy-based application load balancers in GCP. Classic Application Load Balancers or Network load balancers do not directly support this feature.
Deploy Argo Rollouts Gateway API plugin
- Apply the below manifest to the cluster to create a configmap. Refer to the Releases page for the available versions and change the architecture if required.
cat <<EOF | kubectl apply -f -
---
apiVersion: v1
kind: ConfigMap
metadata:
  name: argo-rollouts-config # must be so name
  namespace: argo-rollouts # must be in this namespace
data:
  trafficRouterPlugins: |-
    - name: "argoproj-labs/gatewayAPI"
      location: "https://github.com/argoproj-labs/rollouts-plugin-trafficrouter-gatewayapi/releases/download/v0.3.0/gateway-api-plugin-linux-amd64"
EOF
- Restart the Argo Rollouts pod and the plugin will be downloaded during the pod startup.

sample pod log shows plugin installation
Deploy Gateway Resource
- A Gateway resource represents a data plane that routes traffic in Kubernetes. Depending on the GatewayClass it uses, a gateway can represent many different kinds of load balancing and routing.
- Apply the below manifest to create a global external Application Load Balancer.
cat <<EOF | kubectl apply -f -
---
kind: Gateway
apiVersion: gateway.networking.k8s.io/v1beta1
metadata:
  name: argo-rollouts-demo-external-http
spec:
  gatewayClassName: gke-l7-global-external-managed
  listeners:
  - name: http
    protocol: HTTP
    port: 80
EOF

Sample gateway API resource
Allow Argo Rollouts to edit Http Routes
- Apply the below manifest to allow Argo Rollouts to edit HTTP Routes resources.
cat <<EOF | kubectl apply -f -
---
apiVersion: rbac.authorization.k8s.io/v1
kind: ClusterRole
metadata:
  name: gateway-controller-role
  namespace: argo-rollouts
rules:
  - apiGroups:
      - gateway.networking.k8s.io
    resources:
      - httproutes
    verbs:
      - get
      - patch
      - update
---
apiVersion: rbac.authorization.k8s.io/v1
kind: ClusterRoleBinding
metadata:
  name: gateway-admin
roleRef:
  apiGroup: rbac.authorization.k8s.io
  kind: ClusterRole
  name: gateway-controller-role
subjects:
  - namespace: argo-rollouts
    kind: ServiceAccount
    name: argo-rollouts
EOF
Create HTTPRoute and kubernetes services
- Create a sample HTTPRoute and connect to the created Gateway resource
cat <<EOF | kubectl apply -f -
---
kind: HTTPRoute
apiVersion: gateway.networking.k8s.io/v1beta1
metadata:
  name: argo-rollouts-demo-http-route
spec:
  parentRefs:
  - kind: Gateway
    name: argo-rollouts-demo-external-http
  hostnames:
  - "argo-rollouts-demo.example.com"
  rules:
    - backendRefs:
        - name: argo-rollouts-demo-stable-service
          port: 80
        - name: argo-rollouts-demo-canary-service
          port: 80
EOF
- Create the canary service.
cat <<EOF | kubectl apply -f -
---
apiVersion: v1
kind: Service
metadata:
  name: argo-rollouts-demo-canary-service
spec:
  ports:
    - port: 80
      targetPort: http
      protocol: TCP
      name: http
  selector:
    app: argo-rollouts-demo
EOF
- Create the stable service.
cat <<EOF | kubectl apply -f -
---
apiVersion: v1
kind: Service
metadata:
  name: argo-rollouts-demo-stable-service
spec:
  ports:
    - port: 80
      targetPort: http
      protocol: TCP
      name: http
  selector:
    app: argo-rollouts-demo
EOF
External loadbalancer with routes configuration
Create a Canary Rollout
- A rollout is a kubernetes custom resource equivalent to a Kubernetes Deployment object. It is intended to replace a Deployment object in scenarios when more advanced deployment or progressive delivery functionality is needed.
- You can either create a new rollout or link the existing deployments in a rollout resource. The Argo Rollouts Gateway API plugin only supports canary deployment. Refer to the Rollout Specification for available options.
- Apply the below manifest to the cluster and wait for the application to be ready, then visit the Gateway IP in the browser.
cat <<EOF | kubectl apply -f -
---
apiVersion: argoproj.io/v1alpha1
kind: Rollout
metadata:
  name: argo-rollouts-demo
  namespace: default
spec:
  replicas: 5
  strategy:
    canary:
      canaryService: argo-rollouts-demo-canary-service # canary service
      stableService: argo-rollouts-demo-stable-service # stable service
      trafficRouting:
        plugins:
          argoproj-labs/gatewayAPI:
            httpRoute: argo-rollouts-demo-http-route # httproute
            namespace: default
      steps:
      - setWeight: 50
      - pause: {}
      - setWeight: 100
      - pause: {}
  revisionHistoryLimit: 2
  selector:
    matchLabels:
      app: argo-rollouts-demo
  template:
    metadata:
      labels:
        app: argo-rollouts-demo
    spec:
      containers:
        - name: argo-rollouts-demo
          image: argoproj/rollouts-demo:blue
          ports:
            - name: http
              containerPort: 8080
              protocol: TCP
          resources:
            requests:
              memory: 32Mi
              cpu: 5m
EOF
- Describe the httproute resource and check the argo rollout pod logs for successful rollout deployment. Argo rollout will modify the weight value in the httproute which will be synced with the loadbalancer.
Initial load balancer routing configuration
Sample Application response. ModHeader chrome plugin used for custom Host header
Perform a Canary Deployment
- Run the following command to change the image which will trigger a new rollout process.
kubectl argo rollouts set image argo-rollouts-demo argo-rollouts-demo=argoproj/rollouts-demo:yellow
- Argo rollout will create the required number of pods to match the traffic percentage. In this case, it will create 3 new pods to match the 50% traffic percentage to the new version.
- Run the following command to monitor the rollout progress. The Argo Rollouts Kubectl plugin can serve a local UI Dashboard to visualize your Rollouts.
kubectl argo rollouts get rollout rollouts-demo
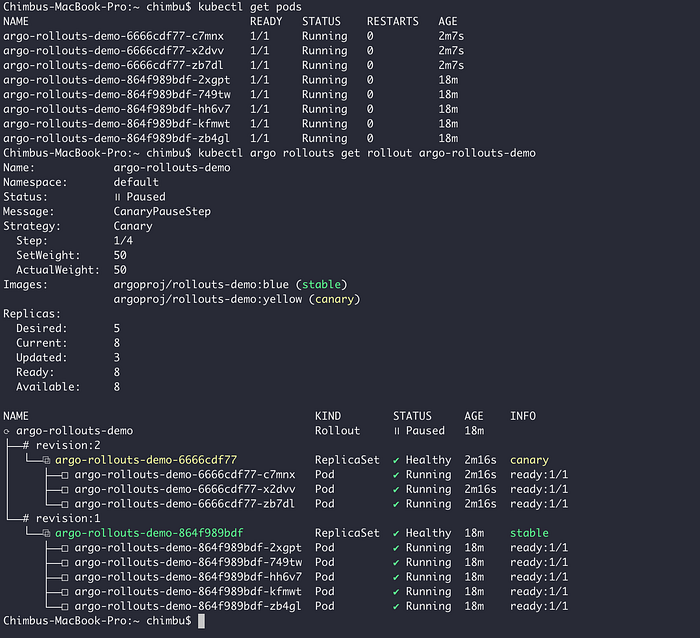
Sample initial rollout status
- Inspect the HttpRoute and verify that Argo Rollouts has changed the weights of the backend services.
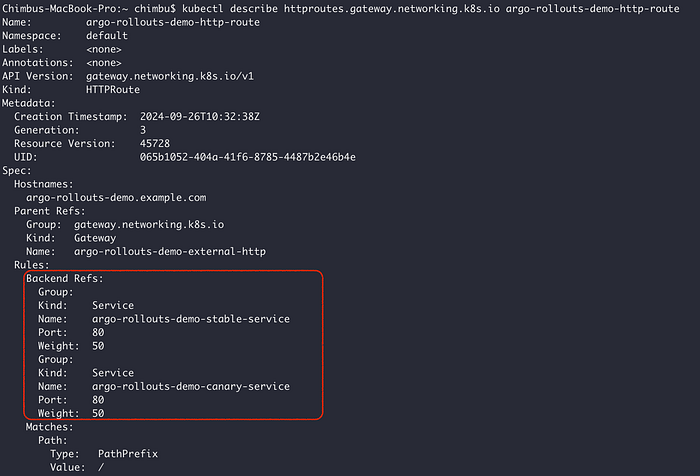
Sample HTTPRoute
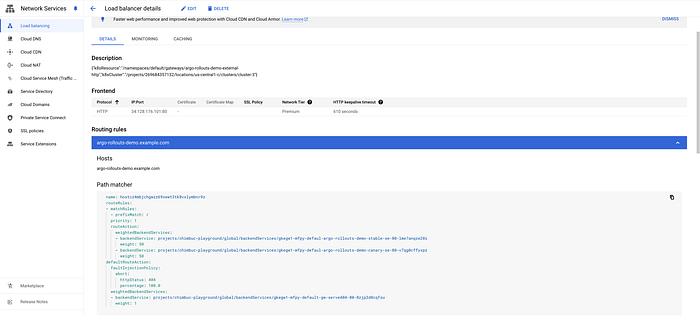
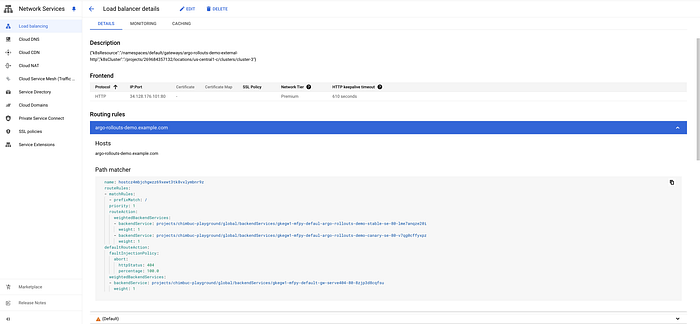
Load balancer routing rules
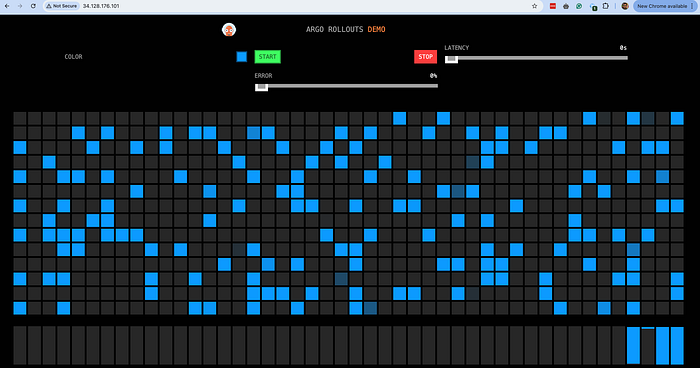
- At this point, each version should receive 50% of requests. You can visualize this in your browser.

Initial Canary rollout
- Promote the rollout with the following command to increase the traffic percentage to the new version. Check the HttpRoute and load balancer routing rules configuration.
kubectl argo rollouts promote rollouts-demo
- Run the promote command again to complete the rollout process, and wait until the old version pods are destroyed. If you change the Rollout image again, the process will start over.
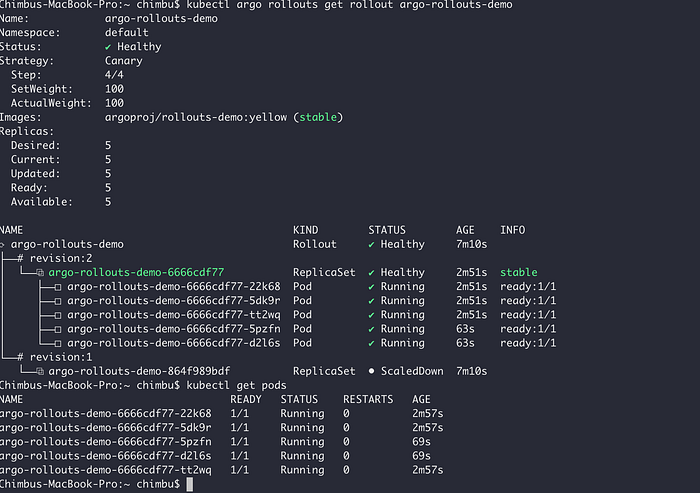
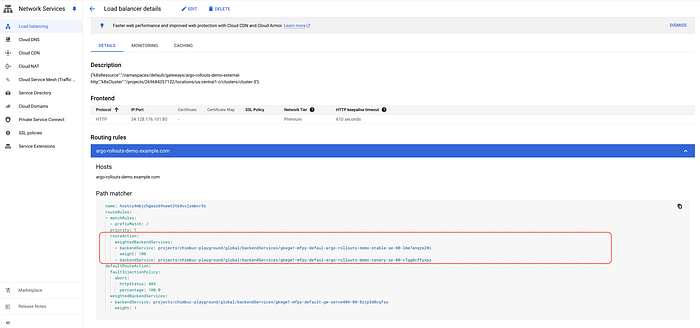
Rollout status after the completion

Updated load balancer routing rules
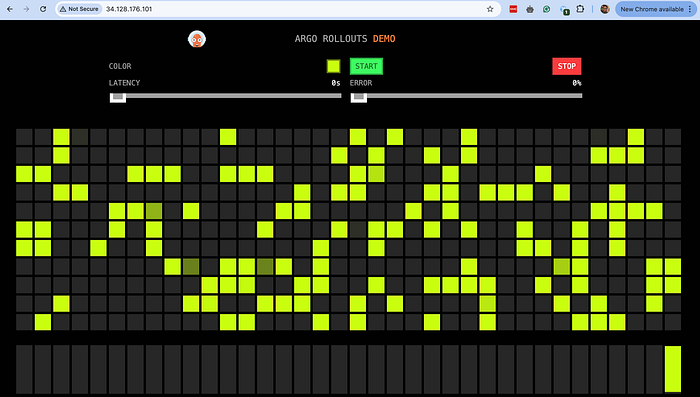
Completed Canary rollout
To conclude, the integration of the Gateway API with Argo Rollouts significantly enhances the capabilities of progressive delivery in Kubernetes. This powerful combination simplifies the traffic routing process, making it easier to execute canary deployments and manage traffic between versions with precision and control.
I trust this blog post has provided valuable insights. If you’d like to know more or are interested in our services, don’t hesitate to get in touch. You can contact us here.